PhotobucketPhotobucketPhotobucketPhotobucketPhotobucket

780x90

Hello! If you're new to Miss Lovie, I'd love for you to subscribe for free updates! You can subscribe by RSS feed or by email! Also be sure to follow on Facebook and Twitter for more Miss Lovie goodness!
Showing posts with label tutorials. Show all posts

Thursday, July 2, 2015

Abstract Art Sunglasses Case DIY


Happy Summer, friends! You can find me over at Thirty Handmade Days Blog with this great summer tutorial, my Abstract Art Sunglasses Case.

It's an easy sew and is the perfect selfish sewing project or a quick gift idea. The best thing about this project is you get to create your own fabric with paint! Sound hard? It's not, and it's fun! Head on over to check out the full DIY here. 
Photobucket

Saturday, January 24, 2015

Floral Love Pillow for Valentine's Day

Valentine's Day is just around the corner! Be sure to check out the full tutorial for my Floral Love Pillow over at Thirty Handmade Days! It's a quick and easy way to add some Valentine's Day cheer to your home.  
 These letters are so fun. I kinda want to put them on everything. 
Happy Heart Day! 

Photobucket

Monday, July 7, 2014

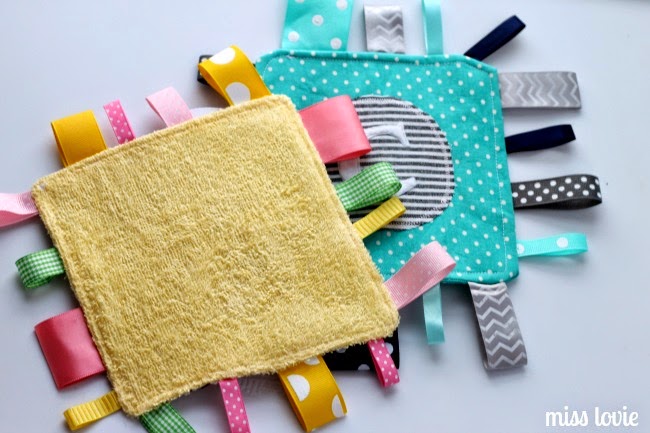
Monogram Crinkle Taggie Baby Toy

Today I'm sharing this super easy and perfect baby gift, the Monogram Crinkle Taggie Baby Toy. I made one of these for my niece and blogged about it here, but didn't write a tutorial for it. This time when I made a couple for friends who had new babies, I snapped a few pictures along the way. 
There are a lot of tutorials for these out there, but I loved the idea of adding a monogram to the toy. Handmade gifts are already so special, but anything with the baby's first initial or their name makes it that much more special. I knew my friends would love these toys for their new babies. 

These toys are baby gold. They make noise and the tags hold the attention of those tiny tiny fingers, and of course mouths. Ha.  And the best part? They are easy to make and pretty inexpensive! 

Let's make one!

Gather your materials:
You'll need some scrap pieces of white felt
Coordinating fabrics for the front of the toy- if you have scraps, you may be able to make those work! 
1 ______inch square
and 1 ____inch circle
Terry cloth or some super soft baby fabric for the back of the toy (1 _______inch square)
Ribbon- various colors and patterns
something that makes noise (cereal, chip, or cracker bags, baby wipe bags, etc.)- I used scrap pieces of lamination I wasn't going to use from a school project. (1 ______inch square) 
________
nice fabric scissors, water soluble pen, liquid stitch or fabric glue, coordinating thread

To make the monogram:
If you are really good and can cut letters free-hand, go for it. I usually can do okay, but I wanted something fancy for a little girl so I printed this letter and cut it out to trace onto the fabric. Use a water soluble fabric pen, trace the letter onto the felt and use your fabric scissors to cut it out. 
Use the fabric glue to glue the letter to the fabric you're using for the circle. Use a water soluble pen to trace a circle around the letter, ensuring it is in the center. Cut out the fabric.
Iron on a matching circle of ____ then peel off the paper backing.
Iron the circle onto the front square of fabric, then zig zag stitch around the circle with a 2/8 inch seam allowance. If you want to stitch around the letter, do that now. I didn't with this letter because I forgot mostly, but I did on the other toy I made with the C on it. It won't matter if you don't stitch it because the glue will keep the letter on, but it will make it look professional if you do this step (and don't forget like I did!). 

Now let's finish this toy. 
Next, cut strips of ribbon about  4 or 5 inches long 
Fold them in half and pin them with the fold facing toward the middle of the square about an inch apart.  Remember that the seam allowance will cut off about a 1/2 inch of the ribbon so be sure that you have the amount of the ribbon you want towards the middle. 
On one edge, space your ribbons about 2 1/2 inches apart. this will be where you turn the fabric inside out once you sew it. It may look a little weird, but once it gets all finished, you won't even notice. 
Next layer on top the back square of fabric right side facing the right side of the top square and then your square of noise making plastic on top. Safety pin the layers in the middle of the square. Pin around the edges well. 
Sew around the edge with a 1/2 inch seam allowance, removing pins as you go, stopping before you get to the larger gap between the ribbons. Don't forget to backstitch. 

Clip your corners and trim any excess fabric and ribbons. If it makes you feel better, you can zig zag stitch the edges or you can use pinking shears to ensure the fabric doesn't fray. (not pictured!) I actually forgot to clip my corners on the blue and gray toy which caused it not to have crisp corners- don't be like me. :) 

Turn your toy inside out and poke out the corners with a blunt pencil or a similar tool. 
On the opening fold the fabric inward to match the rest of the fabric, press with an iron, and use a whipstitch to hand sew the opening closed. 
Press both sides of the toy, then top stitch around the edge of the fabric with a 3/8 inch seam allowance. I usually just keep my eye on the foot and be sure it is in line with the edge of the toy. 

Finished! 
These are so easy and cute. 
Any baby would love them. 

In the picture above, you can see a few of my ribbons got skewed a little while sewing so they aren't completely straight. You'll want to prevent that as much as possible, but if you can't it's not a huge deal. 
Soft, brightly colored, noisy, personalized, and ready for baby!!

If you loved this idea for baby, be sure to check out my tips on making a Faux Chenille Baby Blanket, and this tutorial on a really easy Easter Flower Onesie Dress! 
And for more simple sewing projects, You'll want to check out this Easy DIY Backyard Hammock, these reverse applique Fabric Heart Coasters, and these Sketchy Dot Placemats.

Thanks for reading! 
Photobucket

Tuesday, March 25, 2014

Spring Sketchy Dot Placemats


Today I'm over at Thirty Handmade Days with this super fun tutorial, Spring Sketchy Dot Placemats!


I definitely may have just taken down the Christmas placemats before putting these on the table so (in March) it was high time for a change - a bright and happy spring-y change! 


Go check out the full tutorial and more pictures at 30Days! I'd love to hear what you think!

Photobucket

Saturday, March 8, 2014

Fabric Heart Coasters Tutorial on Thirty Handmade Days

So I just realized today that I never shared this super fun news with you! I am still contributing for Mique at Thirty Handmade Days, but I am no longer just a jewelry contributor there (which means I'll be sharing more jewelry here!), I'm a "craft" contributor. The word "craft" can mean pretty much anything so I'm excited to share lots of different types of projects over on 30days! In February, I shared some Fabric Heart Coasters. 
I wanted to be sure and fill you in on them since they're so easy and sweet and would add the perfect soft touche of color to your own home or would make great gifts. You should definitely head over to 30Days and check out the full tutorial. 
While I made them for Valentine's Day, hearts are great for any time of the year in my opinion and you can make them in some fun spring-y colors. They are a fabulous scrap-busting project, too. Go check them out and be on the look out for my next contributor post, too. Hint: it'll be another great spring sewing project!  
Photobucket

Sunday, February 9, 2014

Anthro Knockoff Heart Collector Pillow

Meet my new love. My new lovey dovey love pillow. I love it. It's Valentine's Day week- I can totally say love that many times.

I've had my eye on Anthropologie's Heart Collector Pillow for awhile now thinking it would be a fun DIY instead of purchasing the original for $198!!! And turns, out, it was. And mine was FREE. Woo!

I just LOVE the saying on the heart. You could write anything on your heart, but I loved their quote so much I decided to just do the full copy-cat. :)

I'm definitely not the first to think of re-doing this fun pillow. There are a few others that re-did this pillow out in the blog world like this one: A Thousand Hearts Pillow from Sweet Savannah and this one: antho-inspired pillow from Hearts and Sharts. Here's my version anyway! 
I love this pillow for some neutral Valentine's Day decorations or just a year-round happy lovey pillow. 
Let's make one!!

I'll be showing you how to create the front of this pillow case cover of this pillow along with how to sew a simple envelope pillow. There are a TON of envelope pillow tutorials out there, but I reviewed this tutorial from Delia Creates before creating this pillow.

Gather your materials:

15 inch square pillow form
1/2 a yard of fabric (linen-looking natural muslin)
1/4 yard of white duck canvas
Coordinating thread for pillow case, black contrasting thread for hearts
Heart Template
A Thousand Hearts Quote Template
Water soluble marking pen
Nice fabric scissors (this makes cutting those hearts super easy!) and pinking shears
iron

I had a pillow form I'd picked up for 99 cents at a thrift store a couple years ago just sitting around so I measured that to determine the size of my pillow form. My pillow was a 15 inch square so I cut a 15 x 15 inch square and two more 12 x 15 inch pieces to make up the envelope back. Depending on how large your pillow is you'll need anywhere from a 1/4 to a 1/2 yard of fabric. The fabric on the anthro pillow looks like a nice linen, but I had a linen-looking muslin left over from some wedding projects so I just used that. The material is a little thin, but it worked out great.

You'll also need some white duck canvas for the hearts (around 1/4 yard). Again, I had some white canvas scraps laying around so I used those. I chose this canvas fabric because I knew it was durable, but would fray nicely around the edges of the hearts. Don't forget to pre-wash your fabric!

For each of the 15 x 12 inch pieces, create a double folded hem by folding the end up a 1/2 inch and pressing well, repeat pressing well. Then, using coordinating thread, sew down the double folded hem close to the edge of the hem. Do this for both back pieces, set aside.

Next, let's trace and cut out the hearts. 
Maybe you have an awesome free-hand and you could just draw a bunch of different sized hearts, but I don't. :) I created a few templates to trace onto my canvas fabric. You can access my templates here. Use your water soluble marking pen to trace the hearts onto the canvas leaving enough space around the edges to cut a 1/4 inch border on the outside of each heart.

Cut each heart out as shown here.
Yay! Pile of hearts!

Create Heart with Words
Now for this heart, I simply taped a piece of fabric to some card stock and ran it through my printer. (Cut fabric to be the same size as the card stock and tape well around the edges. You can also use spray adhesive, but I was out of that so I used scotch tape. Just make sure it is nice and flat against the paper) If you need more details on how to print on fabric you can follow this tutorial. It's super easy. Then just place the largest heart template on top of the words, trace and cut out. You can use my template  for the quote, if you want to use the same words that fit inside the largest heart template.

Pin hearts in place.
Once all your hearts are cut, place them on the front piece of your pillow cover and start pinning.
Pin and pin and pin some more. Yay! Heart takeover.

Now let's sew! 
Exchange the coordinating thread for the black contrasting thread on your machine. Then, set your machine to a small stitch length (like 1 or 2). This will make it easier to create nice curves. I liked to start sewing my hearts towards the bottom facing the point of the heart because I felt the heart didn't move around as much when I did it this way. Start sewing there, remembering to back stitch. Only do a few back stitches so you minimize the darker line in that spot. When you get to the point, leave your needle down, lift your presser foot, turn your fabric until your needle is facing the line again, and continue sewing. On the curves, only sew a couple stitches, then turn your project so the needle is facing the correct way. The picture above on the right shows how I have my needle lined up perfectly on the drawn heart. If you have it in line the whole time, you'll have a nicely sewn heart. Since you're using contrasting thread, it's important that these aren't too messy. 
Keep sewing until you've sewn all the hearts. This may take awhile. I watched a movie on my kindle while I sewed and it flew by! :) You can obviously see all the blue lines from my water soluble ink, still but all those will come out when you wash it! 

Next, wash and dry the top piece of your cover. 
You wouldn't normally need to wash your fabric (again!), but we want the hearts to have those nice frayed edges, so in this case you will. It'll look like this when you're done. Wash and dry on delicate cycle and then take an iron and press it so it's nice and flat for sewing. 
Lay the two back pieces on top of the cover right sides facing each other, with the two back pieces overlapping. Switch back to coordinating thread and sew up all the sides using 1/2 inch seam, then cut the edges with pinking shears. (You could also serge the ends or use a zig zag stitch on the edges.) Be sure to clip the corners to decrease the amount of bulk in there allowing you to have crisp corners.
Turn that cover inside out (through the envelope back), use a point turner or a blunt pencil to push out the corners, and press the edges flat. Press the entire pillow cover and trim any too long frayed edges for a nice finished product.

Finished! 

I was a little worried about the ink from the printer fading or even washing away, but it held up well. Not sure how many washes it could withstand, but I don't plan on having to wash it too much, so it'll be fine. 
This sweet pillow will be on display in our living room for now, but I have a feeling it will find a permanent, year-long home in our bedroom after Valentine's Day. 
It's just too cute to be seasonal. 
I hope you loved this tutorial! 

Thanks for reading. I'd love to hear what Valentine's Day projects you're working on this week! Leave a link in the comments and I'll come check them out! 

Need more ideas? Check out these Valentine's Day and heart ideas from the archives:

Have a Happy Valentine's Day week!

Photobucket
Related Posts Plugin for WordPress, Blogger...

invisible ad