PhotobucketPhotobucketPhotobucketPhotobucketPhotobucket

780x90

Hello! If you're new to Miss Lovie, I'd love for you to subscribe for free updates! You can subscribe by RSS feed or by email! Also be sure to follow on Facebook and Twitter for more Miss Lovie goodness!
Showing posts with label Wreaths. Show all posts

Thursday, September 18, 2014

Spooky Skull Halloween Wreath

 Oh my gosh. You guys. I've been dying to share this project with you for weeks. This Spooky Skull Halloween Wreath is probably one of my most favorite projects I've made in a long time! I love the colors, the glitter, the stripes, and the spooky, of course. 

So much glittery Halloween-y goodness.
If you want more pictures of this wreath and instructions on how to make it, go check out my tutorial on Thirty Handmade Days!! 

Thanks so much for reading! 

Photobucket

Tuesday, February 12, 2013

Color Block and Scallop Valentine Wreath

I know I'm really late in posting any Valentine projects, but I couldn't not post it. :) I have had this wreath mostly done besides the hand embroidery for the past week and a half, but have had a hard time finding the time to finish it! I've been trying to narrow down some vendors for my wedding and, of course, at school. I hope you know I would definitely rather be blogging!
So this wreath was so super fun to make. As soon as I saw this Scallop Felt Ghost Wreath by Tatertots and Jello, I just knew I had to make a wreath using those felt scallop strips. SO cute. I thought it would be fun to add in some extra color besides just my usual go-to color for valentine red. I love how the color blocking turned out and the scallops are precious.
The various garlands were so fun to make, too. Cuteness.

If you'd like to make one too, follow along! 
Materials Needed
straw Wreath Form (with plastic left on)
15 red strips of felt cut into scallops (25 x 4 inches for all strips)
5 pink strips of felt cut into scallops
and 3 white strips of felt cut into scallops
hot glue gun
coordinating embroidery floss and needle
various garland materials: more felt, ric rac trim, tulle, matching thread, embroidery floss
Cover the wreath in scallop strips.
Cut felt into strips and then cut out scallops using the template. You can print the template onto card stock, cut out tape together and it creates a long scallop strip about 25 inches long.  Pin the strip to a couple or 3 strips of felt at a time and cut around the template. 

Once strips are cut, start wrapping red scallop strips around the wreath form, making sure entire form is covered and scallops' hills and valleys are alternating. Use hot glue to secure. 
Cover about 3/4 of the wreath in red scallops. Cover about 3/4 of the remaining portion of the wreath with pink and then cover the remaining portion white. To end the wrapping part, tuck the flat end under some scallop hills and valleys and glue to secure so you can't tell where the end is. 

Create garlands and attach to wreath.
Heart Garland
To create the simple heart garland, just cut out hearts from two pieces of felt at a time to get matching hearts. hot glue one of the matching hearts under the ric rac and then the other matching heart on top. Continue until length of ric rac is full. I alternated Large pink hearts that  I later embroidered using a blanket stitch and smaller red hearts. 

Tulle Pom Garland
To create the tulle pom garland, cut a 10 by 6 inch length of tulle (I like to use these tulle rolls you can find at Hobby Lobby). 
Fold the tulle over itself three times and then up again once. 

Cut all the edges off the folded tulle to create a stack of tulle strips. Use a matching piece of thread to tie a knot in the center of the strips. Cut lengthwise cuts into the tulle up to the tied center on both sides. Trim the ends to make the tulle more square and ready to be fluffed into ball form.

Fluff the tulle into a ball. Fold the tulle ball over ric rac and secure wit hot glue. Continue for entire length of ric rac. 
Fringe Garland
The fringe garland should be pretty self explanatory-simply take a strip of felt and cut tiny vertical cuts into it all the way across. I used a running stitch across the top of this garland. 

Bow Garland
The bow garland was simple, too, and I did not take pictures. Simply make felt bows by cutting rectangles. Fold rectangles like a fan and then use a tiny rectangle of the same color felt to bind the fanned felt in the middle. Trim the edges with pinking sheers. Make enough bows (the same size) to create a garland. Glue the corners of the bows together with hot glue. 

XOXOXO
After all the garland is glued on, cut out some Xs and Os from felt (2 pieces per letter) and use a blanket stitch around the edges to secure the pieces together. Simply hot glue the letters on top! 

I hope you enjoyed this Valentine Wreath tutorial!! 

Thanks for reading!!
and Happy Valentine's Day!!!
Photobucket

Wednesday, November 28, 2012

Berries and Ornament Initial Wreath Tutorial

 I got excited when I was asked to create this wreath for a work friend because I knew I'd get to do something fun. I love the traditional Christmas colors, but I wanted this wreath to be extra bright and cheery since it was going on a first grade teacher's door. :) The lime-ish green ribbon I used to wrap the wreath did just the trick-and the polka dots of course. When it comes to decorating classrooms, polka-dots are always my go-to move. Ha.
I was originally going to do a picture tutorial, but this wreath was so easy, I didn't take step by step pictures. You can do it. 
Materials Needed: 
Wide ribbon  for the wreath(50% off at Michael's!)-mine was wired, but it doesn't need to be. 
More wide ribbon for the bow. 
Straw wreath form
Large Initial
Small paintbrush
Glue/mod podge, glitter
Berry sprigs (I used two different ones and trimmed them down to work for me)
Ornaments
Hot glue 
Wrap your wreath with the wide ribbon, adding hot glue every now and then as you go. 
Trim your sprigs some, mix and match, do whatever you like. Find a place where you think it looks right and hot glue it on. Hold it down for several seconds to insure it sticks since the sprigs will most likely be kinda heavy. Glue on some ornaments to fancy up the sprigs. 
 Paint large dots of glue dots on your initial. (Mine came white-from Michael's-, but you may need to paint yours if yours did not.) Sprinkle glitter over the glue dots and let dry. Once dry, tie a sweet little ribbon bow to your initial if you like! Glue the initial to the wreath over the bottom of the sprig. Make sure everything looks right and level. 
 Hot glue a fun ribbon on top and you're done! You can glue a knotted ribbon loop to the back of the wreath to use for hanging if you like. 
Hope you love this simple, but bright and happy idea for a Christmas wreath! 

Thanks for reading!
Sharing via the parties on my sidebar. 
Photobucket

Wednesday, October 10, 2012

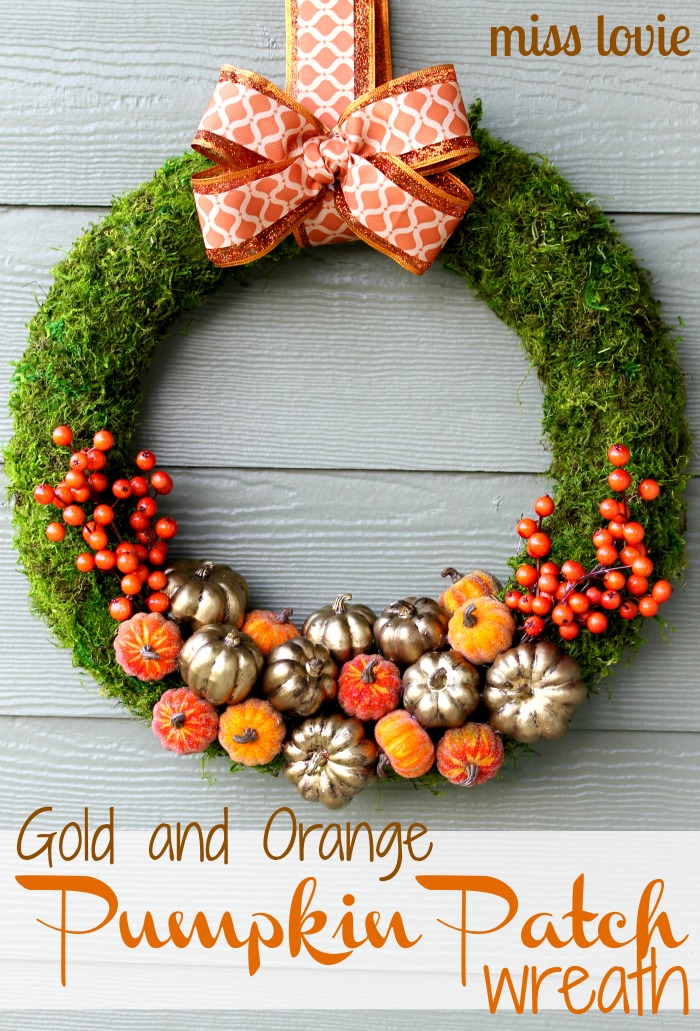
New Fall Wreath! A Gold and Orange Pumpkin Patch

While I love my fall wreath from last year, I needed something new. And I LOVE this wreath even more.
I am so excited about enjoying it until the Christmas decorations go up! 
 If you haven't figured it out yet, I love gold and I think gold and orange together is SO pretty for fall. 
I'm loving the orange and gold with that vibrant green, too. 
I got my inspiration from this beautiful wreath on Etsy:

If you'd like to make a wreath like mine, read on! 
First lets paint some pumpkins. Find some dollar store pumpkins. Paint some gold and then leave the rest orange. I used pumpkins that were all roughly the same size. Above you can see that I also "antiqued" the gold pumpkins as well. I love that look. 
I used gold spray paint to paint all the pumpkins gold first and then once dry, I used this water-based stain in Walnut. I got the idea to antique pumpkins from here, but my process was a little different since I used a different paint. 
 Paint your gold pumpkin completely with the stain and then use a clean paper towel to wipe off the stain where you don't want it. Let dry. Easy! 

Making the wreath is super easy too. 
This part is optional, but makes the wreath look clean and professional. Wrap the straw wreath form in strips of green fabric. (You only need half a yard.)
 Then use hot glue to attach moss to the front part of the wreath. There's no need to waste the moss on the back of the wreath since it's covered with the green fabric.
 Then simply glue on your pumpkins! If you want to add some berries, simply stick in some springs on the sides. I didn't even glue this part.
 

 Add a fun bow to the top. 
 And enjoy. :) 

Hope you love it!

I'll be linking this up to my favorite parties on my sidebar. 

Oh and I know that some of you may have thought I died...since I haven't posted in ever. But no worries-I've just had a lot going on at school and in life. More to come on that later. :) Have a fabulous rest of your week! 
Photobucket

Friday, August 31, 2012

Back to School Wreath

As my Back to School Event is nearing the end, I have one of my most favorite projects to share! I've had Back to School wreath ideas in my head for awhile, and I finally had the time to sit down and play around until I landed on something I loved. 
 When school time rolls around, the thing we all think of is school supplies, so I thought, why not put a whole bunch on a wreath?! I love those pencil wreaths and crayon wreaths out there, but I teach kindergarten and we use a lot more "stuff" than that! I wanted to included not only school supplies but the other things we use daily in our classroom. Any elementary teacher is familiar with lots of these: blocks, magnetic letters, dice, paint brushes, scissors, glue, play dough, connecting cubes, rulers, etc. I wanted a wreath that represented our day in kindergarten. I really wanted to fit a tiny book on there, but  I ran out of room. Ha.
 I added the chalk board and bunting for a little extra fun. The chalkboard's wooden border is covered in ribbon and rick rack. I wrote "Welcome" for the Back to School season, but I can change it throughout the year if I want. The bunting is just pinned on (it's a straw wreath form) so I could technically change it out if I wanted to. 
 I didn't take pictures for a tutorial for this, but it's super simple. 
Wrap your wreath with strips of fabric, then hot glue a ton of "stuff on there. The end. Ha.

 I wanted a layered effect so I started layering a couple of rulers on one side, then piled on the crayon box (which I glued the crayons inside the box so they would stay out), the play dough and my colored pencil bouquet (see below.)

Around the bottom of the wreath I didn't add as much because these little pieces looked so nice against the blue.  The tip to give you when making this wreath is to use lots of glue. :) Hot glue will, of course, melt if you hang any wreath outside, though, so be sure to hang a wreath like this in the shade or inside (like on a classroom door!)
I secured the chalkboard with some velcro wrapped around the wreath since it was a little wobbly, but everything else is stuck on really well. 

I hope you love it. It has definitely made my classroom door cheery. Even if you're not a teacher, it would be great to put on your front door when it's time for your kids to go back to school. Mr. Lovie was actually really sad I was taking it to school...he wanted to put it on our front door...(and we don't have kids)! Ha.

Happy Friday :)
Go check out the other Back to School Events!
Go link up YOUR Back to School projects at my very first linky party ever! Any school-themed projects are welcome. I'll feature my favorites on Sunday! 
And come back tomorrow for one more Back to School idea!

Photobucket
Related Posts Plugin for WordPress, Blogger...

invisible ad