PhotobucketPhotobucketPhotobucketPhotobucketPhotobucket

780x90

Hello! If you're new to Miss Lovie, I'd love for you to subscribe for free updates! You can subscribe by RSS feed or by email! Also be sure to follow on Facebook and Twitter for more Miss Lovie goodness!
Showing posts with label For the Home. Show all posts

Tuesday, August 21, 2012

Reading Chair Makeover

I'm pretty much in love with my new chair. I've been so excited to share it with you! 

Creating a special, warm, inviting, and quiet place to read with your children, whether you are a parent or teacher, is very important. As most parents and teachers know, reading is one of the best things you can ever do for your child, especially when they're young, but also all throughout their lives. Exploring new and old favorite books in your special reading spot with your children creates memories that last a lifetime and helps them develop academically as well-rounded, knowledgeable people. As a teacher, I sit in my special reading chair you see here and encourage the kids on the carpet to lean in close as I introduce them to all my favorites. As a parents you could get your kids to pile on your lap while you sit in your special reading chair, cuddle them close, and read for as long as they'll let you. 

Anyway, here's my special reading chair.

 If you don't have one yet in your home or classroom, consider making one over like I did! 
So this chair has been in my family a long time. When I started teaching, I took it from my parents' basement, knowing it would be perfect for my classroom. I had thought I would paint it the following summer, but of course that didn't happen. Five years later, I finally decided to do a proper makeover.
First, I glued some of the pieces back into place with Gorilla Glue and let the chair dry for the recommended amount of time. Then I sanded it-by hand. I wrongfully assumed this task would be quick and easy. Those of you who make over furniture regularly know that sanding furniture is never quick and easy, but I did it. The above picture shows the chair after sanding. Before painting, I wiped it down, let it dry, and then sprayed several coats of primer on it. After primer, I sprayed several coats of semi-gloss spray paint. 
Man I love it. SO much better. Then I used this tutorial to make a cushion. I just love the colors in that fabric!
And just to make the chair a little cozier and fun, I sewed a little Sprocket Pillow to place at the back of the chair. 
 
So much cuter-and more comfortable! I tested it out in my classroom yesterday. It really is a perfect special reading chair. 

Do you have a special reading chair you love?

And be sure to come back tomorrow for more great Back to School ideas!

Photobucket

Wednesday, August 1, 2012

So You Think You're Crafty Projects Re-Cap

Well if you follow me on Twitter or Facebook (if not, you should so you don't miss anything!!), then you have noticed something is missing...me not bugging you to go vote on your favorite project on So You Think You're Crafty this week!! Being eliminated last week was rough...my project for this week's theme, On the Go! was so fun! (I'll share eventually) and I was really having fun during the competition. However, it's been nice not stressing about next week's post for it, as well, and I've squeezed in a little relaxation before my new school year meetings start up so that's good. There are still some great crafters left so you should keep following along and keep voting...I know I will be. :)

If you missed any of the projects I made for the contest, here they all are! Enjoy.
Comfy times.
 Tutorial coming soon, I swear!! :) This week, I hope, for reals.
 My heart still swoons over this necklace...(and my hands might ache a little in remembrance, too)
I miiiiiight be already tweaking this project. Oops. Any updates will be posted. :)
Shabam. Take that fading ombre trend. :) Love this necklace, too.
Hello, new summer essential.

Finally, here's a sneak peek of the project I didn't get to post (because I didn't get enough votes to continue to this week...) for the "On the Go" theme. I'm kinda super excited about it and will share it with you soon!!
If you're a teacher or a parent, you might have guessed what it might be, but it's still cooler than you think :)

Thanks to everyone who supported me in the So You Think You're Crafty contest and for all the positive comments about my projects. You guys are the best.
Thanks for reading and see ya soon!
Photobucket

Monday, July 30, 2012

EASY DIY Backyard Hammock

So last week's theme for SYTYC was "Let's Hear it for the Boys". Since I have no little boys in my life, I wanted to make something for the man in my life. :) 

Enjoy!! 
Creating anything for boys or men in your life is super tough. I've made ONE thing for Matt ever before. Ha. This makes two things in 3+ years. This is an easy idea, though that everyone can enjoy...a backyard hammock! Hammocks are surprisingly SO easy to make so this sweet little getaway would be really simple to do! He can go just a few steps out our door and have a super comfy place to just relax.  You could even attach some hooks to your walls indoors and bring this getaway idea inside if you wanted to!
I used some nice home decor fabric to make the hammock because it was strong while also soft, and it was two-sided! I made some tree straps to attach the hammock to trees. They're extra long so you can attach them to the thinner trees like in this yard by wrapping the strap around the trunks a couple times or just once around larger trees. And look how wide it is!! Perfect. 
Oh, and you have to make sure you have to make sure to add a little table so you don't have to move or get up for anything you might need. :)
The pillows are made out of sturdy duck canvas. They're not really needed since the hammock is pretty comfy as is, but I thought they were a nice addition, just for fun.
 Here you can see the tree straps a little closer and the gathered ends of the hammock. I made four tree straps. Two for wrapping around the trees about 10 feet long and then 2 that were 2 feet long that were used to thread through the ends of the hammock so the hammock would gather. 
I attached both ends of the short tree straps to the carabiner and one end of the long tree strap that is attached to the tree to the carabiner as well. This is the easiest way I've seen to attach a hammock to a tree.(Be sure to use real carabiners that will support a person's weight!)  
Here's how the tree straps were attached to the tree. Simply loop the strap around the tree (a few times if the tree is thin like this one) and then slip one end through the loop on the other end of the tree strap and pull tight. 

If you want to make one here's a few more details! 

Materials Needed:
3 yards of canvas or home decor-type sturdy fabric
15 feet of 1 inch webbing 
matching thread
2 climbing carabiners

You will use the whole length and width of your three yards of fabric. Mine was almost 60 inches wide. Hem all edges of your fabric. 
 Then fold over the short ends of your fabric 5 inches, press and pin. 
 You will sew several lines on this fold to reinforce its strength. Sew the first line across about 1 1/2 inches from the folded edge. 
 As you sew, move your pins down so that they're already in place to sew your next line. Line the edge of your foot up with the last line you sewed in order to keep your lines straight and at an appropriate width away from the last line you sewed. I sewed about 7 lines on each end. 

And that's it for the hammock. Told you it was easy. :)
For each tree strap you will create loops like these above sewn down by sewing a boxed-in X. 
First cut the webbing into four pieces: for the short straps that are threaded through the ends of the hammock, cut two pieces about 2 feet long. For the long tree straps, cut the rest of webbing you have left in half. 

For each tree strap you make you will create loops on each end. 
To create the loop, fold the webbing over itself so that the loop is folded over 3 inches. Start sewing your box 1 1/2 inches down from the folded edge and all the way to the end.
I used this Sewing Tree Straps video to make sure they were strong enough. Basically you just sew a ton of lines on each box and X.

And that is seriously it for all of it. Follow the pictures and directions above to hang it and relax! If any of this didn't make sense, please let me know! :) Enjoy your new easy hammock!
It's definitely already a favorite spot at our house! Hope you love it!!

More on the results of last week's round of So You Think You're Crafty later. :)
Linking to the parties on my sidebar including:
Making the World Cuter Monday
Photobucket

Monday, July 9, 2012

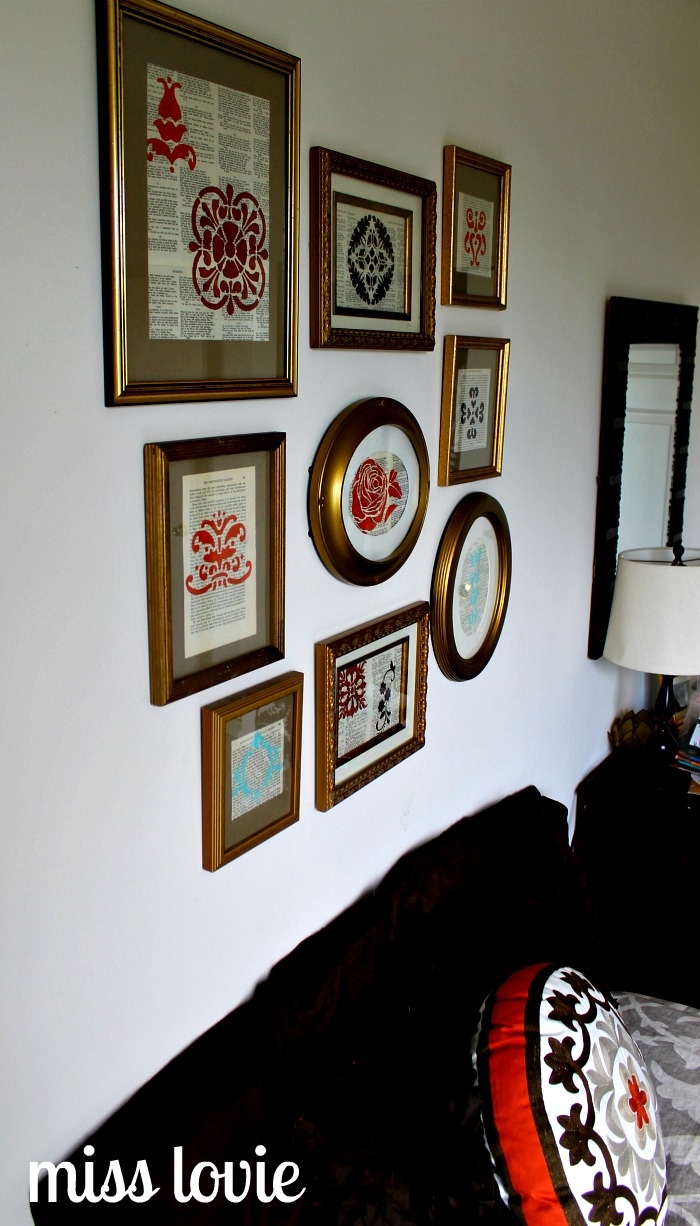
DIY Book Page Art Gallery Wall

Thanks to everyone who voted last week on So You Think You're Crafty! I made it to the next round!!   I think when I did it last year, I didn't make it through week 2 so I'm excited I did this time! 

Week 3's "Summer Bounty" projects are up now! Go Vote for your favorite! 

Now on to today's project! This was my Repurposed Project from last week. Did anyone guess it was mine? :) My close friends might have guessed because of all the gold. I kinda love gold-decor, jewelry, anything. 

Anything made out of book pages has been a very popular "repurposing" project for a long time. While I love the book page wreaths and mod podged items, I've always loved book page art.
 I desperately needed something on the walls in our guest bedroom, and there is nothing cheaper than DIY wall art. 

 I used stencils to create art on the pages of William Shakespeare's plays and the pages of H.G Wells' "Outline of History". Both old books I bought for $3 each and I found all the gold frames from thrift stores. 


I made framing mats for the frames that needed them and hung them in our guest bedroom above the bed. I just love how it all turned out.

Love.
Want to make your own book page art gallery wall? It's super easy. 

Materials: 
Old frames, all sizes (thrift!)
Old books, medium-large(thrift!)
Exact-o Knife
Stencils 
(can find for cheap/use coupons at Michael's, JoAnn's, Hobby Lobby, Walmart, etc.)
Paint 
(I used stencil paint and acrylic and the stencil paint definitely didn't run as much under the stencil, but you can't always find it in the colors you want.)
Stencil sponge brushes
Stencil Adhesive (or any spray adhesive-if you can work fast)
Poster board or card stock to make mats for frames 
(I used a taupe-ish color poster board I found at Michael's-cheaper!)
Pliers (maybe)


Find your frames first so you know how you want your book pages to sit/what size mats to make for the frames. I got super lucky at the thrift stores and found several sets of matching frames! I'm not one to be so matchy-matchy, but having two of the same frame a few times in the whole gallery wall, spaced out looked nice.
Some of my frames were pretty old and had paper backing glued on with staples on top. Some of the staples I had to remove completely with pliers and others I could just pull back in order to get the back of the frame out. 
On the older frames I had to cut out the backing in order to remove the art/picture inside.

Clean all glass/remove all art/pictures.

**Before you start cutting book pages, lay out all your frames on the floor and decide how you want your gallery wall to look. Be sure to space them out evenly (and if you're trying to get it totally perfect you can even measure between frames so they're evenly spaced). Make cut-outs from poster board/cardboard/grocery bags, etc. of each of your frames and put those in the wall in the same pattern your frames are on the floor. Be sure to find the center of where your gallery wall art will be and work out from there. Move them around until you like it and then transfer the frames to where the cut-outs are. 
Read more details about this process here on HGTV's website
It sounds tricky, but it's not. Have fun with it! 

I was super excited I found the Shakespeare book. It worked best for using two pages side by side. (More on that in a second.) Medium/large books will work best. 
 Cut out pages from your book by carefully sliding your Exact-o knife down the inside spine of your book. Cut as straight as you can. 

Now lay out your book pages on each frame to see where they will go. Some frames may need two pages side by side to fill the frame (More about that below). Decide if you need to make a new mat or use an existing photo mat. Some of the photo mats I could reuse, but some frames were too big and needed smaller mats to frame the book page(s) I wanted for that particular frame. You can buy these or make your own!
To create the mats needed for several of the frames, I used this video to help me create the photo mats.
 I wanted some frames to go up on the wall horizontally, but then the book pages were not wide enough to fit in the frame if I kept the page vertical so the words read correctly. To fix this, I simply taped two pages (that went together in the book-side by side!) together from the back. My Shakespeare book was perfect for this. I cut out two pages that went together (like page 109 and 110) so that if you opened the book those were the two pages open. Then I straightened out the edges that would be taped together by laying them on top of each other and using a ruler and a rotary cutter to make a straight edge. I flipped them over and laid them edge to edge (not overlapping, just touching) and taped all the way down the back where the two pages touched. When I turned it over, (on the Shakespeare pages), it would say "Act IV, Scene II" or whatever and (because I'm an English nerd) I thought that was awesome.

On the smaller frames or frames you plan to hang vertically, you probably won't have to do that. 
 Next you need to choose a stencil or two. On some frames I just centered my stencil and only used one and on others I used two. It's up to you. They do sell stencil adhesive and it would probably work best, but I didn't want to pay $5.99 so I just used the regular spray adhesive I had. This will work-if you work fast. Ha. The spray adhesive will pull the paper apart if you wait to long to remove the stencil. This only happened to me once, however, and most times it was very easy to remove. 

First, position your matting over your book page to determine where you want your stencil to go. Spray the back of your stencil lightly with adhesive spray and lay your stencil on top of the book page and press down around all edges (to prevent paint from seeping through). Remove matting and get ready to paint. 
 Using a stencil sponge, dab the paint all over the stencil. Work in a back and forth sweeping motion or circular motion, being careful not to go too fast or pull up the cut out parts of the stencil so the paint doesn't run under the stencil. 

I do recommend stencil paint. It's cream-based and won't run and looks very clean. Stencil paint, however, may not come in the color you want so if you use acrylic, just be careful. As you can see above on the last picture on the right, some of the paint ran under the stencil and I just touched it up with a small paint brush by creating my own design so that I wouldn't have to do that page again! 

After you're done painting, carefully peel back the stencil and set aside. 

Let dry. Cut to size. Place in frames, hang frames on wall, and you're done! 


Thanks so much for reading!
And for voting!
I really appreciate you. :) See you soon! 

Tomorrow I'll be back for another 30 with 30 Challenge post and I hope to have more tutorials up this week, too. I'm headed out of town again on Wednesday, but I'm going to try to keep things going around here. :) Have a great Monday!

Linking to the parties on my sidebar.
Photobucket

Sunday, April 29, 2012

Leafy Wreath

Finally a craft post! YAY! 
Here's the wreath I made to give away as a door prize at our school carnival this weekend.

I got my inspiration from this wreath I found on Pinterest forever ago. 
You can purchase that wreath here: Jane Joss Etsy shop. Be sure to go visit the Jane Joss shop. She's got some beautiful items. 

I made my leaves very similar to the way the Etsy shop owner describes hers, but I added a flower as well. It turned out really pretty. I like the neutral colors, but it would be fun in bright colors, too. And especially in fall colors during the fall. 


It was a pretty quick Friday night project. And I was happy to hear a friend of mine at school won the wreath. She said it would match her current decor perfectly. 

I decided to make a tag last minute. I'm loving my new polka dot stamp.


Hope you love this leafy wreath as much as I do. I needed something a little different and this one was fun to make. I'd like to keep experimenting with it and do some other variations with colors and different flowers. 

Thanks for reading and have a great week! See you again soon! 
Photobucket
Related Posts Plugin for WordPress, Blogger...

invisible ad