PhotobucketPhotobucketPhotobucketPhotobucketPhotobucket

780x90

Hello! If you're new to Miss Lovie, I'd love for you to subscribe for free updates! You can subscribe by RSS feed or by email! Also be sure to follow on Facebook and Twitter for more Miss Lovie goodness!
Showing posts with label Recipes. Show all posts

Wednesday, March 5, 2014

Apple Banana and PB Green Smoothie

Today I'm excited to share with you my newest obsession: Gree Smoothie Awesomeness. Today I'll be sharing my recipe for my Apple Banana and PB Green Smoothie! 

Seriously, if you haven't hopped on the green smoothie bandwagon, you totally should. These are so good. Have trouble getting your veggies in? Don't eat enough fruit? Looking for an easy and healthy on-the-go lunch or breakfast? Want something that is both delicious and filling? You have found it in the green smoothie. I've heard of lots of people using this as a meal replacement, but it could also make a great afternoon healthy snack as well! 

And guess what! They don't taste "green" at all! Especially not my recipe. It's pretty delicious actually. And if you've never tried a green smoothie, this is the perfect "Beginner Green Smoothie" recipe.

After trying a few really great recipes from Simple Green Smoothies and loving them I decided to try out their easy Green Smoothie Formula  and create my own recipe.
And, it turned out great! It is definitely one of my most favorite green smoothie recipes I've made! 

This recipe will make about 4 cups or so depending on the size of your apple and banana so you could split in in half after making it and share it with a friend or save the other half of it for the following day. 

Apple Banana and PB Green Smoothie 
Ingredients:
Liquid: 2 1/2 C Unsweetened Almond Milk and 1/2 cup of water
Greens: 2 Cups of Spinach (mine was frozen)
Fruit: 2 cups of chopped honey crisp apple (one medium honey crisp apple), 1 cup of frozen banana (1 banana)
Boosts: 2 Tbs of reduced fat peanut butter, and 1/2 cup of Greek vanilla yogurt
When you make smoothies, be sure to chop your ingredients into small pieces and it's also a great idea to freeze your fruit espeically ahead of time. You can also freeze your greens too (everything but the liquid if you want!). Freezing your fruits will make your smoothies more frothy and frozen without adding ice. Adding ice takes away from the flavor. 
Add your greens and liquid to the blender and blend those first. 
Then add the rest of the ingredients- chopped apples, chopped banana, yogurt, and peanut butter and blend again.
When everything is blended and smooth, pour it into a pretty glass and enjoy! 

The additions of the peanut butter and Greek yogurt make this smoothie extra filling and delicious. I'd love to hear your thoughts if you try it! 

Thanks for reading!
Photobucket

Thursday, June 13, 2013

My Favorite Things Thursday: 10 Favorite Fast and Easy Recipes

Hello and welcome to My Favorite Things Thursday!!
Today I thought I'd share with you my most favorite fast and easy dinners I use ALL. THE. TIME. Seriously some of these I kind of have memorized I've made them so much. The reason I make them so often is simple: they are easy, delicious, and pretty fast. I did not include side dishes here because I usually make some sort of steamed/cooked veggies with nearly every dish. 

Enjoy!! 
Be sure to click over and read about how easy and delicious they all sound! 
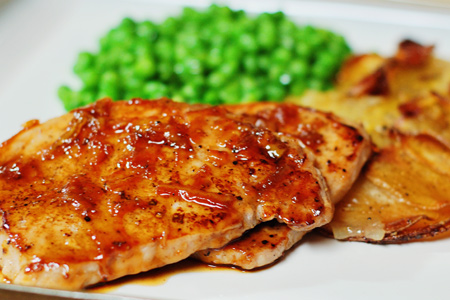
This may be the best discovery I've ever made. This recipe is also crazy cheep. Orange Marmalade, a tiny bit of seasoning, and good chops go a long way. This is the perfect dinner to cook when you don't feel like cooking because it takes next to no effort at all. Love that. 
If you love salmon, stop what you're doing and go make this. It looks and tastes fancy, but it is super easy. I always get the "wow, this is really good honey" every time I make this. 
This is another great go-to recipe because all it takes is a few spices and sugar you already have in your pantry and some chops! Easy. If you don't know the Budget Bytes blog yet, get on there and explore. So many great ideas.
Mmmm. My mouth is watering just thinking about this one. I love pesto and chicken and cheese so this dish is my heaven. I usually make this to serve over rice. Kalyn's Kitchen is another one of my fave cooking blogs.
Um, can I just say that parmesan cheese should always on top of fish. Yum. I know a mayo crust sounds a little weird, but it's amazing, I swear. Again, this is so easy!! 
This Parmesan crusted fish dish is a little more healthy than the one above since it doesn't have the mayonnaise, but it's just as tasty. 
Hello comfort food. Easy and customizeable for everyone in the family. Yes.
Ok, so confession: this one is not as fast as the others since there is a little chopping involved, but its so good I had to include it. You won't be sorry you spent an extra 10 minutes on this one. 
I don't even like hamburgers really, and I love these. Everyone I've ever made them for does, too. I use the lean beef and whole wheat tortillas to make it a little better for us and they're still great.
This recipe is great for lunch or dinner. We like to pair these with sweet potato fries!!

I hope you enjoyed reading about my favorite recipes. Be sure to check out my Recipes Board on Pinterest for more!

Feel free to leave links to your favorite fast and easy recipes. I always need more!!
Miss Lovie Creations
Grab a button if you were featured! 
Photobucket

Wednesday, August 29, 2012

Banana Bus Snack Idea with Kitchen Fun With My 3 Sons


Today's guest post is Jill from Kitchen Fun With My 3 Sons. If you haven't visited her blog, go now, quick. She has the most fun ideas that she uses in her kitchen with her boys. SO fun. I found her blog awhile back and was hooked immediately. She is so creative and artistic. What she and her sons are able to make out of easy foods we all have is always amazing to me. 

Enjoy!
----------------------------------------------------------------

My name is Jill and I have a blog called Kitchen Fun With My 3 Sons that I share with my 3 little boys.  We created fun food mostly for kids and our blog is loaded with fun treats, breakfast, lunches, dinners, & silly snack ideas! We are excited to be sharing one of our fun Back to School snacks will all of you today. This is a simple and healthy School Bus Snack for the kids.  My boys are not fans of fruit, but they will gobble up any fun fruit that we make!  
Thanks to Allie for inviting us to be a part of her Back to School event!
Banana Bus
1 Banana
2 Dark Grapes (or Blueberries)
1 Strawberry
Black Edible Marker
Take the banana and cut off a little from the bottom so it will sit up straight.  Draw a line in the middle of the side with your black edible marker.  Take the cut off piece from the bottom and pop off the banana attached to the peel.  Cut strips with a knife and then into small squares.  Press the small square cut outs on the side for windows.  Cut off the end of the banana.  We used scraps to make a bumper.  Cut off a small corner out of the front end.  Set aside. Then cut more off almost to the bottom. Place the first cut out piece on top.  Cut off the end of a strawberry for the stop sign.  Everything will stick on.  That's it!  
---------------------------------------------------
So cute. And healthy, too! If that sweet little snack isn't enough motivation to go visit Jill, check out some of my favorite posts from Kitchen Fun With My 3 Sons!
Check out the rest of the Back to School Projects here
Come back tomorrow for a Back to School Link Party where you can link up your own Back to School ideas! 
Photobucket

Saturday, January 28, 2012

Vintage Happy Birthday "Wreath"

Happy Saturday!!
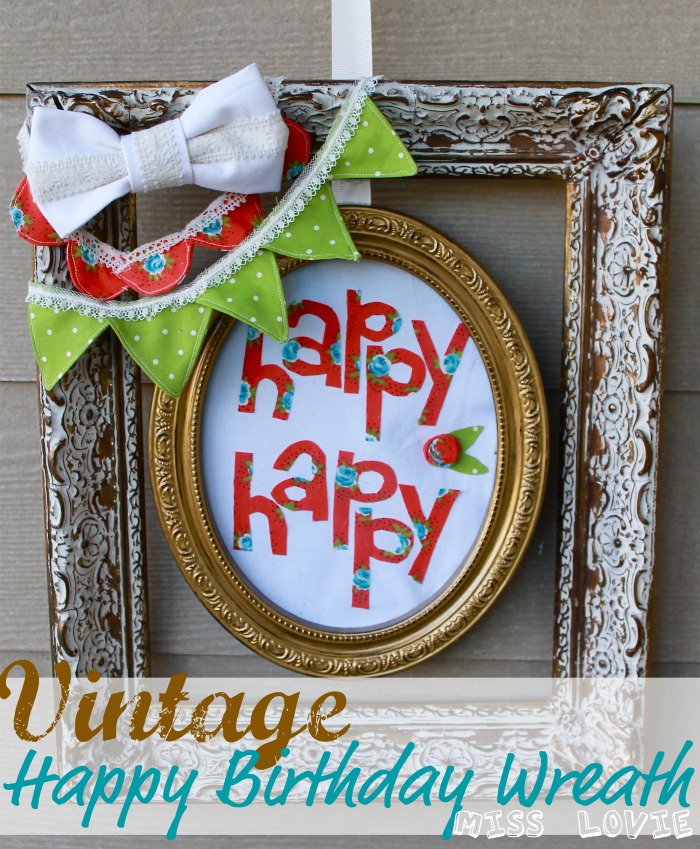
I hope everyone is having a great weekend! I'm excited because my awesome sister, Maggie, is up visiting me all weekend...and it's her birthday!! Since I still had my Christmas wreath up, (don't judge me...) I decided to make Maggie a special wreath so she'd know how excited I was to see her this weekend.  And the Vintage Happy Birthday Wreath was born.
 I borrowed both frames from other projects...The big one is the frame I used in my Framed Yarn and Lace Heart Wreath that I originally got at an antique store. The small one is one I painted to frame some Curly Girl Designs cards I love. Since neither frames were currently hanging, I figured I could borrow them. 
 Then I just cut out some letters from an old vintage sheet (the coral floral fabric) and used fabric glue to stick them onto a white oval of fabric and stuck it in the frame. Then I whipped up a couple of tiny buntings with the vintage sheet and some other fabrics and lace I had on hand. The corner looked a little bare so I made the bow using my speedy hot glue technique that I also used for these bows that I promise I'll share with you at some point. 
Even though it's for a birthday, I think it'd be cute anywhere, any time really. I need about 10 more of those white and gold frames...love it.
Hope you like it!! 

So while I was making the wreath last night, Mr. Lovie was making this awesome thing. 
 This Killer Peanut Butter Mousse Brownie Pie (found here) is absolutely amazing. I highly recommend it. 
 Obviously. 
Mr. Lovie and I make a pretty good birthday weekend team, I'd say. And don't  make fun of me for my square "pie pan". It's what we had. Ha!! 

Oh and Maggie was really excited to have her birthday on "Christmas" this year...
I mean why even take the tree down now, right? Ok so it might come down tomorrow. Maybe. 
Her birthday presents look good under there.

Thanks for reading! Linking my "wreath" up to the parties on my sidebar!! 
Photobucket

Thursday, December 22, 2011

A Last Minute Gift Idea: Pretty Packaged Christmas Candy

 Anyone else scrambling to get it all done? 
 Yeah. Me, too.
 I thought these fun and pretty packaged Christmas Candies might help some of you... I made them this morning. They are seriously an easy and fast last minute gift. I saw the packaging idea here via Pinterest. It's just a little piece of scrapbook paper folded over a ziplock bag, stapled on either side and embellished with bows. Quick and easy. And the best part is, if you're like me and hoard craft supplies out the wazoo, you already have all that stuff. 
 I got the recipe for the Dark Chocolate Peppermint Bark at Hersheys.com. The one on the right is from the actual recipe except it's milk chocolate, not dark chocolate. I made a batch with dark chocolate, too, though, and I think I like it better. The one on the right is actually a bag of Ande's Mint Baking Chips (found at Walmart) melted and topped with crushed peppermint as well. I made it the same way as the Dark Chocolate Peppermint Bark. It is crazy easy to make. Which is why I chose it. :)
 So pretty and festive.
 I made the first batch of these for coworkers and actually put them in some sweet holiday tins I found at JoAnn's for 60% off. 
 I thought I'd go ahead and make a couple more batches and fix them up nice for those unexpected gifts you always need. You know those kinds of people...a neighbor that pops over unexpectedly with something yummy for you and your family, a coworker who you didn't realize you were that close to gives you a little something, etc. You can make up several of these and hold on to them for the unexpected gift giving. And if you don't end up needing them, attach them to a gift you're already giving or eat them yourself! Believe me, you'll want to! 
Here are some of the other last minute gifts I'm attempting to make today and tomorrow...
I've just made 3 or 4 of these sweet ruffly scarves. These are not the kind that keep you super warm, but will look oh so cute and stylish. 

I'm hoping to add some fabric flower pins to them, too, using the flowers I made here, here, and here, maybe. 

And I'm hoping to squeeze in time to make another couple of these (I already made one for Mr. Lovie-and he is already using it!). 

And hopefully this sweet casserole carrier. Wish me luck!!
Thanks for reading.
Linking this post to the parties on my sidebar!
Photobucket

Tuesday, December 13, 2011

Today You'll Find me...


Today I'm over sharing my favorite holiday traditions at Mommy By Day, Crafter by Night! 
Come check out my Christmas Morning Breakfast Casserole
and the never-ending Christmas Card pictures!
See you there!
Photobucket
Related Posts Plugin for WordPress, Blogger...

invisible ad