PhotobucketPhotobucketPhotobucketPhotobucketPhotobucket

780x90

Hello! If you're new to Miss Lovie, I'd love for you to subscribe for free updates! You can subscribe by RSS feed or by email! Also be sure to follow on Facebook and Twitter for more Miss Lovie goodness!

Saturday, July 9, 2011

Follow Me!!!

 http://www.stopwatchhut.com/
 I broke down and got a Twitter Account. So, follow me on Twitter. Click the link or that button. I'm feeling like I've got social media out the wazoo right now. All to keep you better informed, my dearie. I'll keep you updated about what's going on with the blog, cool links I find from other great crafters, and just whatever's on my mind. 

Don't forget to add me on Facebook.
http://www.facebookloginhut.com/facebook-login/

Or subscribe to my blog on RSS.
http://www.facebookloginhut.com/facebook-login/

And if you've made anything from any of my tutorials, link up your pictures to the Miss Lovie Flickr Group!
http://www.facebookloginhut.com/facebook-login/

I've got a tshirt refashion coming up tomorrow. And yes, it does include ruffles. Now I'm going to get off this crazy computer for awhile and watch a movie with Mr. Lovie.
Happy Weekend, everyone.

Friday, July 8, 2011

Easier is Always Better

In an effort to make it easier for you to browse my blog, I created a Tutorials page. Direct your eyes to the tabs at the top and click on Tutorials! It's still a work in progress, but it will help you find things a little easier. Still can't find something? Type it in the search bar over there on the right. 

On the tutorials page, among many others, you'll find tutorials to make
this:
and this:
and these:

Happy browsing!

Wednesday, July 6, 2011

Refashion #1: Ankle and Granny to Awesome and Trendy

I'm so excited about my first refashion!
One of my favorite things to find on blogs is a refashion section. I am always so amazed that people can take something hideous and make it something beautiful, like taking a $3 skirt at your local thrift store and turning it into something that would sell for $35 at your local mall. I'm equally amazed by those who can miraculously find these old beat-up pieces of furniture at flea markets and thrift stores, see potential in them, and recreate a gorgeous piece for their home. 

If you love decorating and re-designing furniture, or want to learn, please go immediately and see Brooke at All Things Thrifty. She does super incredible things and then tells you how you can do it, too. Things like this:
and this:
and this incredible-ness:
Go over there and learn something. I do every time I visit her blog.

 The first time I really took notice of the idea of going thrifting and refashioning clothing was when I saw the section Kathleen had done on her website, Grosgrain, called Thrift Store Thursday where she shows you how she took things from thrift stores and reworked them into something else. I fell in love immediately.
Here's some of her fun refashions:
 Browse through Thrift-Store Thursday section of her blog. You'll love it. 

Another great blog that is fully dedicated to refashioning that I recently found is C&C or Cotton and Curls
Here are some of her fun refashions:

She also has a page on her blog where you can link up your blog called Refashion Nation if you refashion anything! I'm sure there are lots of great refashion blogs out there you could check out.

So when I see the inspiration, I bookmark it or "pin" it all because I think, "Someday I will do something like that!" Unlike many things I bookmark that I forget about or don't make time for, the day has come. I have done a refashion from a $3 ankle granny skirt. 
And. I. Love. It. 
Consider me officially addicted to refashions. I have 2 more pieces of clothing waiting to be reworked.
 When I saw this pattern at the thrift store I knew I needed it. It was fun and a great shade of turquoise-y green. The feel of it is slick and it's thin-I'm sure it's some sort of cheap poly blend or maybe just straight poly, but it feels cool on hot summer days like today.
 And of course the best thing about elastic skirts is you can wear them anywhere on your waist (high or around your hips) if you don't make the elastic part too tight. 
This is my favorite kind of outfit. I could make 20 more of these and be in heaven. 
I kinda used this 20 minute skirt tutorial from Ruffles and Stuff. I strayed from it some and probably shouldn't have since my seam is not super straight (thus the reason for no super close-ups of my sewing handiwork.) I consider myself a pretty novice sewer still and will definitely make more of these to get better at it. 

The best thing about this skirt re-fashion is that it was super easy (even though I managed to screw it up a little-not that you can tell though, really). I simply cut off the top elastic, picked out the seams with my seam ripper (not the bottom hem!!!), and then followed Disney's tutorial! I used the existing hem already in the skirt so I didn't have to re-do that part. Fun and easy. Yay.

Thanks for reading and go do some thrifting - you never know what you'll find that could turn into something awesome!!

Tuesday, July 5, 2011

Bridesmaids Jewelry and Drawstring Pouches

Just wanted to check in and show ya what I've been working on lately.
 Last weekend I was super busy working on these: 4 pairs of earrings and a necklace for a bride-to-be friend's bridesmaids. Their dresses were a deep purple chiffon and I have heard (the wedding was Saturday) that the jewelry looked great! 
 Cluster Earrings.
I don't remember how I learned to make clusters. I may have tried to follow a few tutorials, but I think for the most part, I figured out a way that works best for me. I'll have to say, before I made these for my friend, I wasn't that great at making them, but after making as many as I did, I feel pretty good about them. Ha!  I love clusters because the combinations of designs are endless! The pearl with the purple turned out so pretty. It was the bride's idea to add in the pearls to the purple and it turned out great!
 Cluster Necklace. Adjustable.
 Drawstring Pouches!! 
I used this great tutorial on Skip to My Lou to make them. They're so easy!!

I wanted to put the jewelry in some type of packaging but the chiffon drawstring pouches they sell at Hobby Lobby were $5.99 for 10 and 5 of them were black (which I didn't want). Like most crafters would, I thought in the store, "No way. I'll just make 'em," so I did. I had some extra fabric left over from making my sister's bedroom pillows and just whipped 6 up in an hour or so! The tutorial really is great. I ended up tying all of the ends in knots like the one in front so they wouldn't come apart, but I loved how they looked not tied, too. I like the fabric on my pouches way better than Hobby Lobby's. And the best part? They were free. 
I just love how they came together. If/when my online shop is made a reality, I like this idea for packaging. What do you think?  There are so many possibilities with using different fabrics, too! Too much work? Or is it worth it? 

Hope you had a great weekend and a fun holiday!

Friday, July 1, 2011

Ruffletastic 4th of July Wreath [+tutorial]

Finally. I have something to post I actually made. This wreath has been a long time coming since I had to get the jewelry project finished first. The jewelry I made for a friend's wedding took longer than anticipated (as most projects do-partly because I procrastinate/get sidetracked and partly because everything sounds so easy in my head and, in reality, often simply takes more time than I think it will). I will show you pictures of the jewelry soon. But for now, the Ruffletastic 4th of July Wreath. :)
I know, I know. Over the top. I don't care. I've decided I like it anyway. And yes I did finish it last night -4 days before the 4th of July-so my neighbors and I will be celebrating a little longer than usual. It's fine.  And since I'm sure you all plan out your projects better than me and have had your decor up for weeks, you can just bookmark this beauty for later.

Wanna know how to make her? Here's some brief details:
Materials Needed:
1. Straw wreath from (because they're cheap and you can pin things into them)
2. Various fabrics (you can use anything. Any cotton works well, though)
1.5 yds for the fabric used to ruffle and wrap the wreath with-I used 2 coordinating blue patterns, 1 cotton, 1 _________
 1/2 yd or so for each red fabric-I used 4 coordinating red patterned fabric, all cotton
3/4 yds. or so for each white fabric-I used white rough silk and a textured thin cotton.
3. Trim for the center of the flowers
4. Sewing materials
5. ribbon for hanging

Step 1: Make the blue ruffle to wrap the wreath form with.
Ruffle 'til your heart's content. And then ruffle some more. 
We're going to make a double fabric ruffle!
 Cut strips of fabric into 4 inch wide strips of the fabric you want peeking out the sides and 3 1/2 inch wide strips of the fabric you want on top. The length doesn't matter because you're going to sew it all together in the end to make one really long ruffle. I think I cut 10-12 strips for each pattern.
 Place the fabric strips on top of each other so the wider strip is peeking from behind the narrower one.
 Set your machine on the highest tension and the longest stitch length to create a ruffle.  Sew straight down the middle of the strips and they should ruffle on their own. Don't backstitch! Don't you love how the two strips ruffle together at the same time?! If it isn't ruffled enough, pull on the thread with one hand and carefully push your fabric down the thread to make the gathers closer together.
 When you're done with all your strips, sew them together by sewing the right sides together on each end, being sure to match up the top strip layers together so it looks like one continuing ruffle when you're done.
When you trim the threads, trim the threads on the sides of the strips all the way to the edge of the fabric (see the arrow?), but not too close on the ends. I leave those threads a couple inches longer than the end of the strip so that it doesn't wiggle out and cause my ruffle to un-ruffle. You can also use those threads to tighten up any ruffles that come loose. You'll hide the threads later.
 Can you find the seam? Don't find my chipped nails, please.
 Pile of ruffles all sewn together is complete!
 Wrap the ruffled strip around your wreath form, securing it with hot glue.
Set wreath aside. 

Step 2: Make flowers.
To make the red flower, I basically did a much larger version of the flower on this tutorial at Made by Lex. 

Fun fact: this was the very first kind of fabric flower I'd ever made before I had a machine so I hand sewed it all.
 For this flower, I started out with a 4"x45" strip ruffled as tight as it would go.
 Once all ruffled, sew right sides together to create a circle. 
 In order to be sure the ends of the fabric don't peek out, you can trim the edges after the seam. 
Then you have your first ruffled circle. Do the same with trimming your threads on this ruffle as you did for the long ruffle you used to wrap your wreath.

For the rest of the circles, just continually decrease the width of your strips by 1/4 or 1/2 inch as you go and your length several inches as you go. I alternate the patterned fabric for each strip. Make 6 (or more, if you want) circles total. The smallest of my circles was about 1 1/4 in. wide and about 10 inches long. Stack the ruffled circles and hand sew them together. In order to get them to turn up a little instead of laying flat, you can hand sew it like this some on the back. 

Once the flower is finished, you can knot up and then twist some trim around itself, hot gluing as you go, to form a large knot (this doesn't have to be perfect.) and hot glue it to the flower's center (covering all the stitching from the ruffles.)
 It should look like this when you're done.

To make the white flower, I used the poppy tutorial on Grosgrain.
This is the same tutorial I used to make my Memorial Day Poppy Pin.
For these flowers I alternated the silk and textured cotton. it definitely gave it a nice textured look!

Make two of each flower.

Step 3: Attach flowers and ribbon.
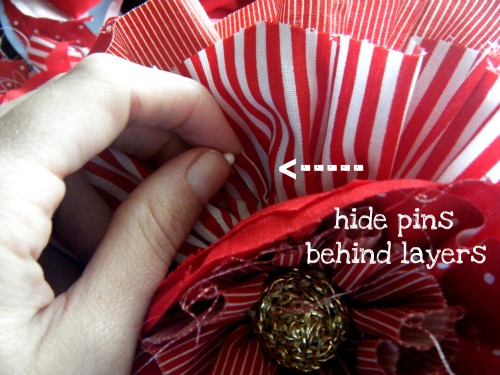
 Attach your flowers with straight pins. Peel back a couple ruffles and stick your pin in. Use a few pins per flower.

Use your ribbon to hang your wreath. If you use a door hanger, camouflage that ugly hanger with my tip here in step 6.
 Those flowers are so outta control. American Love.
What is everyone doing for the 4th?
 We're spending it in Paducah on Kentucky Lake with my friends I discussed in this post. After teaching two weeks of summer school, a 3 day weekend on the water and in the sunshine with my favorite people and puppy dogs is very welcomed!
Related Posts Plugin for WordPress, Blogger...

invisible ad