


Today I'm sharing this super easy and perfect baby gift, the Monogram Crinkle Taggie Baby Toy. I made one of these for my niece and blogged about it here, but didn't write a tutorial for it. This time when I made a couple for friends who had new babies, I snapped a few pictures along the way.

There are a lot of tutorials for these out there, but I loved the idea of adding a monogram to the toy. Handmade gifts are already so special, but anything with the baby's first initial or their name makes it that much more special. I knew my friends would love these toys for their new babies.
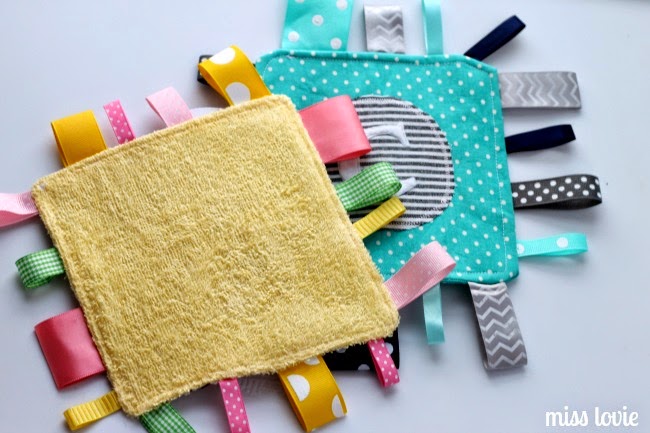
These toys are baby gold. They make noise and the tags hold the attention of those tiny tiny fingers, and of course mouths. Ha. And the best part? They are easy to make and pretty inexpensive!
Let's make one!
Gather your materials:
You'll need some scrap pieces of white felt
Coordinating fabrics for the front of the toy- if you have scraps, you may be able to make those work!
1 ______inch square
and 1 ____inch circle
Terry cloth or some super soft baby fabric for the back of the toy (1 _______inch square)
Ribbon- various colors and patterns
something that makes noise (cereal, chip, or cracker bags, baby wipe bags, etc.)- I used scrap pieces of lamination I wasn't going to use from a school project. (1 ______inch square)
________
nice fabric scissors, water soluble pen, liquid stitch or fabric glue, coordinating thread
To make the monogram:

If you are really good and can cut letters free-hand, go for it. I usually can do okay, but I wanted something fancy for a little girl so I printed this letter and cut it out to trace onto the fabric. Use a water soluble fabric pen, trace the letter onto the felt and use your fabric scissors to cut it out.

Use the fabric glue to glue the letter to the fabric you're using for the circle. Use a water soluble pen to trace a circle around the letter, ensuring it is in the center. Cut out the fabric.

Iron on a matching circle of ____ then peel off the paper backing.

Iron the circle onto the front square of fabric, then zig zag stitch around the circle with a 2/8 inch seam allowance. If you want to stitch around the letter, do that now. I didn't with this letter because I forgot mostly, but I did on the other toy I made with the C on it. It won't matter if you don't stitch it because the glue will keep the letter on, but it will make it look professional if you do this step (and don't forget like I did!).
Now let's finish this toy.

Next, cut strips of ribbon about 4 or 5 inches long

Fold them in half and pin them with the fold facing toward the middle of the square about an inch apart. Remember that the seam allowance will cut off about a 1/2 inch of the ribbon so be sure that you have the amount of the ribbon you want towards the middle.

On one edge, space your ribbons about 2 1/2 inches apart. this will be where you turn the fabric inside out once you sew it. It may look a little weird, but once it gets all finished, you won't even notice.

Next layer on top the back square of fabric right side facing the right side of the top square and then your square of noise making plastic on top. Safety pin the layers in the middle of the square. Pin around the edges well.

Sew around the edge with a 1/2 inch seam allowance, removing pins as you go, stopping before you get to the larger gap between the ribbons. Don't forget to backstitch.
Clip your corners and trim any excess fabric and ribbons. If it makes you feel better, you can zig zag stitch the edges or you can use pinking shears to ensure the fabric doesn't fray. (not pictured!) I actually forgot to clip my corners on the blue and gray toy which caused it not to have crisp corners- don't be like me. :)
Turn your toy inside out and poke out the corners with a blunt pencil or a similar tool.

On the opening fold the fabric inward to match the rest of the fabric, press with an iron, and use a whipstitch to hand sew the opening closed.

Press both sides of the toy, then top stitch around the edge of the fabric with a 3/8 inch seam allowance. I usually just keep my eye on the foot and be sure it is in line with the edge of the toy.
Finished!

These are so easy and cute.
Any baby would love them.
In the picture above, you can see a few of my ribbons got skewed a little while sewing so they aren't completely straight. You'll want to prevent that as much as possible, but if you can't it's not a huge deal.

Soft, brightly colored, noisy, personalized, and ready for baby!!
If you loved this idea for baby, be sure to check out my tips on making a Faux Chenille Baby Blanket, and this tutorial on a really easy Easter Flower Onesie Dress!
And for more simple sewing projects, You'll want to check out this Easy DIY Backyard Hammock, these reverse applique Fabric Heart Coasters, and these Sketchy Dot Placemats.
Thanks for reading!

3 comments:
Thanks so much for the tutorial, these are so cute!! I would love to make one! :) Wishing you a lovely day!! xo Holly
Thank for share
top biz
ty le bong
Everything is very open with a clear clarification of the issues. It was really informative. Your site is very useful. Thanks for sharing.
bamboo skewer manufacturers
Post a Comment