Yay! My first (successful) t-shirt refashion! It's kinda hard to believe that's actually true when I have probably a billion t-shirt refashion ideas bookmarked. I've somehow not done any of them yet. Too many crafts-not enough time. Story of my life.
Hope you enjoy reading about my version!
I wanted the ruffle to start up on the shoulder and cascade down. I did make it like that, but then it didn't quite work out. Read on to see what I did instead and to make one yourself!
Materials needed:
1 t-shirt- I got mine on Target special ($8 or $9?)
1/4 yd of cotton, 1/4 yd of gray tulle, 1/4 yd of lace
Sewing essentials
Step 1: Make ruffle(s)
I added the (s) because my original plan was to make only one ruffle, but I ended up needing a couple more. Make what you need. You'll see what I mean.
To make the large cascading ruffle: Cut a 4.5inx28in strip of gray cotton, a 4 in. strip of tulle, and a 3 in. strip of lace. Fold all these in half and press each one separately. Set aside lace and tulle strips. Create a tube out of the gray strip. (To see how to make a tube go to
Step 4 of my tutorial and use the directions on how to make a tube there).
Once the tube is created, zig zag the edge of the tube that is opposite the seam. This part is optional, but it adds nice texture.
Take the folded tulle strip and put it around the gray strip with the seam nestled inside the fold of the tulle. Pin as you go being sure the gray is flush against the tulle.
Do the same with the lace.
Using a 1/8 seam allowance, topstitch to hold the layers together, removing pins as you go. Then stitch again to ruffle the strip, but with a 1/2 in. seam allowance and change the setting on your machine for ruffling (set tension as high as it will go and stitch length as long as it will go.)
Step 2: Pin ruffle to shirt and sew.
Pin the ruffle wrong side down to the top of the shoulder.
Sew across the top
and press down.
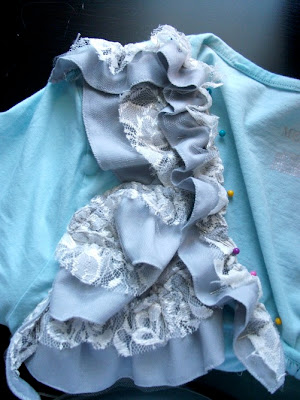
Create a zig zag pattern by folding ruffle on top of it self each time it is turned. Pin so that the ruffle looks as if it is cascading.
Sew ruffle down.
When you come to a spot where the ruffle is folded on itself, keep the needle down in the fabric and rotate the shirt and sew the ruffle down.
Here it is with only one ruffle. It looks okay off, but when I put it on, it was totally weird looking.
The ruffle at the top was not ruffly enough and the other parts of it looked weird.
Plus I sewed part of the collar to the ruffle on accident and had to pick it out thus creating a hole. Awesome. I almost tossed this shirt in the "to be turned into something else pile". But then I thought, "More ruffles is always better, right?" and made a couple more.
If yours looks weird, too, create 1 long thin ruffle that will start at the top of the shoulder and then all the way down the collar (to cover up that hole) and anther tiny one (not shown in the picture above) to go on top of that piece at the top that wasn't ruffled enough. Just added ruffles in the empty spaces or in the spots that looked strange. To make the thin ruffles adjust the measurements of your strips. The length should always be almost twice the length of where you want your ruffle to go. The gray strip should be 3 in. wide, the tulle 3 1/4 in. wide, and the lace 2.5 in. wide.
Step 3: Look cute. Yeah.
Turns out, I like the final product better than my original vision.
Hope you enjoyed the tutorial.
Also check out how to make the lace and pearl earrings I'm wearing
here!
Send me a pic if you create your own Fancy Ruffle Tee!


