PhotobucketPhotobucketPhotobucketPhotobucketPhotobucket

780x90

Hello! If you're new to Miss Lovie, I'd love for you to subscribe for free updates! You can subscribe by RSS feed or by email! Also be sure to follow on Facebook and Twitter for more Miss Lovie goodness!

Thursday, August 25, 2011

The Voting Paid Off! Thank you!!

Who's an official competing crafter of So You Think You're Crafty? Me! YAY!


Thank you so much for voting for your favorite craft! Now me and 9 other lovely ladies will be competing every week for 10 weeks until it is down to just one of us. I'm pretty excited! 

So some of my readers have told me (ok my close friends and family have told me) that it was obvious which one my craft was. I made the Mixed Media Bracelets!!
So if you missed my part of the post on So You Think You're Crafty, here it is!

Making jewelry is so fun and addicting. I seriously want to make 10 more of these bracelets. They are sparkly, soft, and feminine. My favorite combinations.
These mixed media bracelets are made from embroidery thread re-woven by hand to create unique colors, rhinestones, chain, and a little wire. 

 I've been so inspired by all the beautiful braided bracelets around the blogosphere, Etsy, and Pinterest that I just had to figure out how to create my own. 

I got inspiration to create these bangles from many bangles I'd seen on sale at the outdoor mall close to my home. 
You could mix the bangle and braided bracelet, 
or mix the colors and wear two of the same styles.
LOVE the way they turned out! 
 I hope you love them, too!

Oh, and there will be a tutorial coming very soon!! :) Thanks for reading!
Photobucket

Wednesday, August 24, 2011

And It Begins Again

Well another school year started for me yesterday. All my kinder babies came bounding in, excited as can be. It was nothing short of a whirlwind of a day. I'm hoping today goes a little smoother. I really wanted to have a couple posts up this week, but it's not looking so good. Turns out I require lots more sleep when working with 22 4,5, and 6 year olds all day after having the summer off. Ha! 

I will hopefully post about results of the So You Think You're Crafty Contest when they're up and then a tutorial on my project will follow hopefully this weekend. See you soon!
Photobucket

Friday, August 19, 2011

New Look!!

Soooo...What does everyone think of the new look on the blog?!

Working with Molly over at Life Made Lovely Designs has been such a great experience. I love her attention to detail, willingness to decipher what I was even talking about and then make it happen, and her beautiful design abilities. I had no idea my blog could look so awesome. I hope you like it, too. You're the one that really counts anyway. :) What do you think????
Life Made Lovely-Designs
If you're thinking about giving your blog an update, go check out Life Made Lovely Designs! You will be so happy you did!

Just really quick, if you are reading this Friday night and haven't voted yet, head on over to SYTYC Season 9 Auditions' voting poll and vote for your favorite project! 
I'm auditioning and am trying to make Top 10! Tonight's the last night you can vote! Thank you!!!


Tomorrow I'm headed to Lexington, Kentucky's Woodland Art Fair for some fun handmade shopping and frolicking in the park. I'm hoping to find something super fun that I probably really need. 
American Founders Bank Woodland Art Fair
Will I see any of you there? 

Photobucket

Tuesday, August 16, 2011

If You Really Love Me....

If you really love me you will:
forgive me for being MIA for the past week and know that I have been pretty much living in my classroom trying to get ready for the upcoming year of teaching kindergarten (kids come next Tuesday!!). I promise there are lots of fun things in store on the blog very soon. Be sure to stick around to find out what!
and 
Go vote for your favorite So You Think You're Crafty Project for Season 9!! That's right. I entered the SYTYC contest this season, and my project along with 13 other lovely projects are up on the site now, waiting for your votes!!

If you're not familiar with the contest, So You Think You're Crafty has a theme every week and each competitor must create something based on that theme and voters (you!) decide who moves on the next week. The competitor with the least votes each week must leave the competition and the competitor with the most votes wins that round. I'd love to at least make the top 10. Go browse and go vote!! 

Thanks!!

Monday, August 8, 2011

Doily Art


After seeing a lot of doily ideas around (on blogs and on Pinterest) I felt inspired to create my own. Who wouldn't be inspired after pinning all this goodness:

Here's my version of doily art:


Wanna make your own? This project will take a day or two  to complete, but it's can be a really inexpensive, interesting option for wall art if you find your canvases on sale, find doilies at thrift stores or in grandma's attic, and use scraps for the ruffles. 

Let's get started.
Paint the canvases.
 Paint your canvases in long even strokes. Let dry.
I have a tendency to dive into projects without researching them sometimes to find the best way to do them. Instead, I come up with my own way and it sometimes works out as planned and other times it doesn't. My original idea to make this art was to paint the backs of the doilies and print them onto the canvas, but the picture above is what I got. Since that paint mess was already on my canvas and I didn't want to start over or fix it, I decided to go a different route: paint all the doilies and adhere them to the canvas. I simply put one doily on top of the painted part. You can hardly tell.

 Next position your doilies where you want them to go. I did this before I painted so I would know what colors I'd want to paint the doilies. 
Paint the doilies.
 The easiest (and messiest) way to get your doilies painted is to put a large amount of paint onto some cardboard and press the doily into the paint with your hands. Then pick the doily up and pull it apart and press the paint into the crevices of the fabric. Your hands will be seriously a wreck. Then let doilies dry. I let mine dry overnight since they were soaked in paint, but it may take just a couple hours.

The doilies could also be dyed, but I used what I had on hand instead of going to buy dye once the direction of my project had changed. Since I already had the paint, it worked for me. I liked how the paint hardened the doilies, too, so I probably wouldn't change it if I did this project again.
Mod Podge the canvas and the doilies onto the canvases.
Get out your Mod Podge and paint the canvas in even strokes for a nice glossy finish on the canvas. Let dry. 
 Now we're going to adhere the doilies to the canvas. Paint both sides of each doily with Mod Podge. The layer under the doily will adhere it to the canvas and the layer on top will give the doily a gloss.
 You'll probably get puddles of Mod Podge in the holes so simply dab it out with the brush. 
 Be sure to smooth the Mod Podge around the doily, too. 

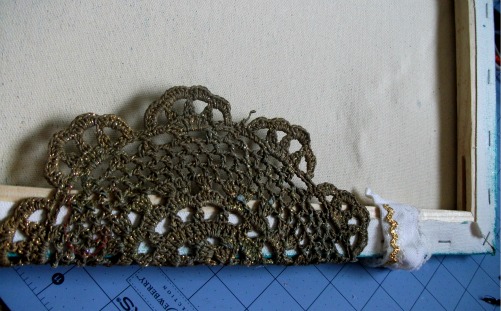
I placed some doilies so they would hang off the edge. When you do this, simply adhere them like you did the rest except let them wrap around the side and then the back as shown here:

Let all doilies dry. Again, I believe I let these dry overnight, but it may not take that long.
You can stop here. But I felt mine needed a little extra something so I made some ruffles. Ruffles are always the obvious choice when you need a little something.
Make the ruffles and glue to canvases.
To make your own ruffles and add them to your art, read on.
Cut strips of fabric about 2 inches wide. Follow directions on the Fray Stop can and spray both sides of all fabric strips.
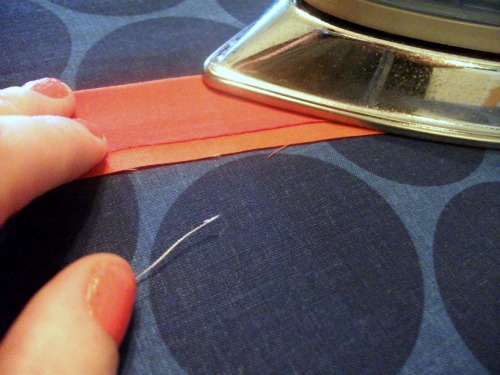
 Then press the strips in half leaving about 1/4 an inch peaking out at the bottom. 
Since you've already sprayed your strips with fray stop they will stick together after pressing. Simply run your finger through to separate layers.
 When you sew the ruffles, stitch along the fold. Your ruffles will look like this:
Use hot glue to glue the ruffles where you want them.  
Do not cut the threads from your ruffles until it is completely glued down.
 To layer the ruffles, I placed the top one on first and then lifted it up, drew a line of glue underneath for the next ruffle. By doing it this way I can plan where the ruffles should be as I go.
 Even though you sprayed your fabric with fray stop you'll probably get this mess. That's okay. Just snip it off once that set of ruffles is glued on. 
 Keep adding ruffles until you're satisfied with the look. 
 If you want your ruffles to go off the sides of the canvas, glue them to the sides only as you go, not the back until you're finished with with the whole set of ruffles.
 Your canvas will look like this on the back. 
When you're done with that set of ruffles, glue the ends to the back and trim the edges.


Stand back and enjoy. :)

These canvases are going in my guest bathroom to spice up the plain white walls that have been there all year that we've lived here!

Hope you enjoyed the tutorial.
I'd love to see yours if you make any! You can upload them to my flickr group or just email me!
Thanks for reading.
Linking here.

Related Posts Plugin for WordPress, Blogger...

invisible ad