PhotobucketPhotobucketPhotobucketPhotobucketPhotobucket

780x90

Hello! If you're new to Miss Lovie, I'd love for you to subscribe for free updates! You can subscribe by RSS feed or by email! Also be sure to follow on Facebook and Twitter for more Miss Lovie goodness!
Showing posts with label Party Decor. Show all posts

Saturday, July 13, 2013

Glitter and Lace on Kraft Paper Gift Wrap

I'm so excited to share my Glitter and Lace on Kraft Paper Gift Wrap tutorial with you. 
My Fancy Bows tutorial has been a HUGE hit on Pinterest, and I love love love wrapping gifts, so I thought I'd try to come up with some more fun ideas. Here's one for now! 

When I needed to wrap a few wedding gifts and was out of my usual wedding wrapping paper, I thought I'd whip up something fun instead of going to spend more money. I knew I already had a huge roll of Kraft paper I had bought to make table runners at Matt's grad party so I went with that. Using what you have is always better than buying new!!

There are SO many fun Kraft paper ideas out there like these...
onetwothreefour

but I wanted to put my own spin on it-which would, of course, include gold glitter. Because I love gold and who doesn't love glitter?! 

(Well okay... I know one person who doesn't- Mr. Lovie. He HATES glitter and was a little sad to say the least about the glitter I tracked all over our house during this project-oops. Do this outside if you can! Then you can just hose your porch/yard down. Ha)


 I know traditional wedding wrapping paper is white/silver, but I think the ivory lace on these helps to lighten up the darker look of the kraft paper. 
So fancy. :) 

Let's make some. 
I got a mondo roll of kraft paper at Lowe's, but it is SUPER thick and was a little difficult to use as wrapping paper. It was perfect for the table runners at Matt's Grad party, but a little thick for this use. It was fine, but just a little thinner paper would have been perfect. I've seen smaller rolls of this (and most likely, thinner paper more suitable for wrapping gifts) for sale at Target. 
Simply use a paint brush to paint a design in glue or Mod Podge. And then sprinkle on the glitter. I always have Mod Podge and it's a little thicker than glue so I like it better almost always.  
Dump off the excess glitter and you have your pretty design! You can never ever go wrong with polka dots in my book.
Wrap it up, tie some lace trim around it. Done. Love. 
My second favorite package was this fun curly loopy lined wrapping paper I made. I just simply alternated small and large loops. 

 I used a super fine glitter, which is beautiful, but it got EVERYWHERE. :) I mean glitter usually does, but whew. You might want to go with a less fine glitter since you'll be handling the package you wrapped. You don't want to be covered every time you pick it up. Glitter that is a little more coarse won't stick to your skin as much. 
I loved the idea of writing words, too! It turned out great - if it wasn't wrapped around a box. Ha. I should have made the words much smaller since once the paper was used to wrap, it didn't have the same effect I was going for. 
Still good, not great. I love this idea if you want to be patient enough to write small words. 

This was a super fun project (and free since I already had all the materials on hand!) and my gift definitely looked very different (and more fun!) than most of the gifts on the table at the wedding. This idea, of course, could be altered for any event you may need a gift for. 

Happy creating! 

Linking this idea to all the parties on my sidebar! 
Photobucket

Wednesday, June 12, 2013

Graduation Party Decor

I am one proud girl. My fiance graduated law school this May. He has worked incredibly hard and has stayed more focused than anyone I've ever seen throughout this whole process. 
Changing careers, moving two hours from where we're both from, spending lots of quiet evenings, weekends, holidays, etc. at home or the library studying will all pay off when Mr. Lovie passes the Ohio Bar Exam this fall and continues to practice here in Dayton shortly after! Then we'll get married. And then the fun starts. :) I'm so happy for him and so very proud. 

With all that being said, you may have figured out my reasoning for being so absent from the blog. Wedding planning, finishing out the school year with my kinder babes, moving to a new home, throwing a graduation party for our families and just other "life stuff" has kinda taken up all of my extra time. I really hope to be able to share much more with you this summer. I have a few really awesome jewelry tutorials I am dying to do, lots of sewing projects in mind, and, of course, plenty of diy wedding ideas on my list as well!! I know that my posting has been really sporadic, but I hope you'll stick around-I promise to make it worthwhile!

So back to the graduation celebration. I thought I'd share a few pictures. Our families live in different states than us and each other so we had never really gotten a chance to sit down and enjoy time together. I think it was a success! 
We cuddled a lot with this sweet little girl (Matt's niece), talked, ate (and then ate some more), watched the Kentucky Derby, and gave Matt high fives. 
We thew this party 2 weeks after moving into a historic home we're renting (that was in the middle of a couple renovations...) so it was a pretty crazy time. Major cleaning, organizing, and unpacking got done during those 2 weeks, and somehow the main area of the house was in decent shape for our guests! 

I made the table runner out of Kraft paper (purchased at a hardware store). I just painted some dots on it with paint from my stash and added a little ruffle to the bottom with a glue gun. The backdrop was made out of about 10 flattened moving boxes taped together with duct tape. I wanted the backdrop to be easy and CHEAP (because moving and parties are expensive) so I purchased some wrapping paper and wrapped the cardboard boxes. Since the boxes were free (thank you, school cafeteria) the backdrop was the same price as the wrapping paper. (yes!)

For the garland on top of the backdrop, I created some simple bunting with scrapbook paper, a paint pen, ribbon folded in half. I sewed the flags into the folded ribbon and done-easy banner! The tissue paper garland is my absolute favorite thing from this entire party, though. LOVE how easy it was and what an impact it makes. I used this tutorial, but I think I used 2 pieces of tissue at a time for a fuller tassel. I made a few tassels out of the kraft paper as well to tie in the tablecloth. 
 Using his law books as decorate the tables was a no-brainer. Easy, cheap, and a perfect theme. 
This pie was a beautiful centerpiece for the food table and the little flag bunting was so fun to make. I may or may not have made it while I was waiting for the pie to set in the fridge...Haha. 
Here' s the other table runner I made for the extra seating. 
 His school's colors were red and navy, but I made sure to incorporate that turquoise/ light blue color so I could use this torn fabric garland I made for his 30th birthday party last year. Matt told me to stop being such a hoarder when I said I was keeping it after the party last year, but see? I really did use it again!

I hope you enjoyed seeing the decorations from our little family party. 
I'll be linking up to my favorite parties on my sidebar.

Be sure to check back tomorrow for My Favorite Things Thursday

Thanks for reading!!

Photobucket

Wednesday, March 6, 2013

Fall Wedding Ideas-Rustic Dessert Table Inspiration

Hi friends! I really have missed you. I'm sorry I've been away so much. School has been keeping me busy as usual, but I've also been making some major decisions for my wedding coming up this fall. I've been doing a lot of weighing pros and cons on different vendors, researching, checking references, and evaluating and re-evaluating the budget. Exciting, but not fun details to really share with you guys! It's paying off because I'm getting to check more and more of my Wedding To-Do list, but unfortunately, between wedding planning, school, and sleep (a little anyway), I haven't had much time for creating or blogging! I've been dying to get in my craft room and just make something already!
In between sleep, work, and meeting with wedding vendors, I've also been planning the fun details of the wedding-like the dessert table. Since I'm not a huge cake-eater (I don't like most icing!), Matt and I decided a dessert table was more "us". We're planning on asking a few select friends and families to help with providing our favorite fall-themed treats instead of doing the big fancy cake. I think we'll do a small cake to use as a focal point on the table most likely, but it won't be the typical huge fancy cake you see at traditional weddings. 

 I hope you don't mind me sharing some of my wedding adventures. I thought I'd share something from this fun creative planning process once a month or so! If you missed my last post on wedding ideas, you can read it here

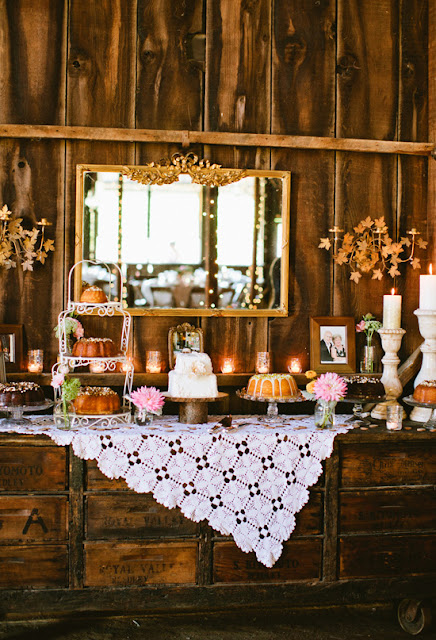
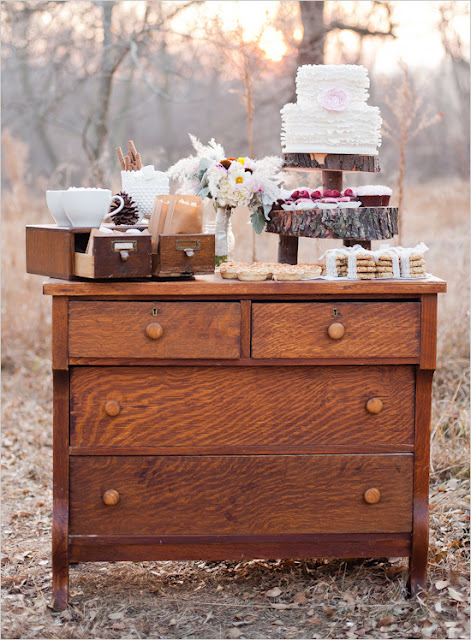
I haven't made any firm decisions about the actual design of the table, but I've had a great time researching ideas. Here are a few of my favorite inspiration tables! 
Love everything on the wall and all the vintage wood. That crocheted lace overlay is great.
I'm a sucker for pretty desserts on pretty, unique furniture that creates a warm homey feel. Love.
Why don't I have this beautiful buffet table in my life? So sweet.
This simple dresser adds a lot of interest to this great small dessert table, too! I'm also loving those repurposed card catalog drawers! 
Man, I love this pie table idea. I really love pie and all these pies of different sizes makes me really happy. 
 I love the custom art backdrop, the linens, and the crates that add height to some of the desserts. The tags are a nice touch, too! 
That curtain backdrop is to die for. So simple and gorgeous. That table is crazy awesome, too.
I love the tulle backdrop and gold frames in this one. 
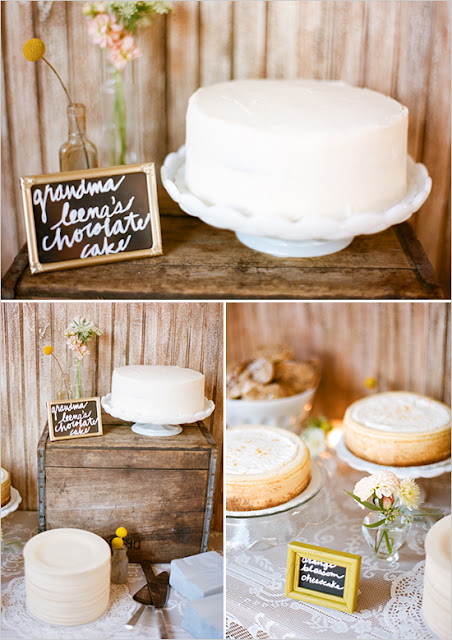
Hey naked cake! Love it! I love the colors of this dessert table mostly. It's so pretty.
The tiny chalkboard frames with the script writing are great. I love the idea of writing the name of the dessert and what friend/family member made it. 

I love that the dessert table will be fun, interesting, beautiful, and personal to us. Do you have any dessert table ideas I need to know about! I'd love for you to send them my way! 

Want more great wedding or party inspiration? Go check out my Wedding Board on Pinterest!
Thanks for reading! 
Photobucket

Sunday, August 26, 2012

Owl Bulletin Board and Scallop Bunting Tutorial


Today's Back to School post is another bulletin board idea for you teachers! If you're not a teacher, no worries, you could still use this cute and free owl template  or scallop bunting template for parties or just fun decor. 
Enjoy!
 This is actually my Welcome Back bulletin board from last year (photos were taken with my iphone so please excuse the not-so-great quality). I loved this idea so much I almost re-used it this year. There is so much owl stuff out there right now and I am crazy about it just like everyone else. 
 I made a little scrunched paper branch for the mama owl to sit on. After taking these pictures, I wrote my name (teacher's name) on the big owl and the kids' names on the smaller owls.
For the owls, I cut bodies out of fun patterned scrapbook paper, wings out of solid glittery scrapbook paper, the eye parts and nose out of card stock. I thought gluing the black circles of the eyes in different spots was funny-they kinda look lost like my kindergarteners usually are that first week of school-ha!
If you want to make your own owls, you can use my free 
The only thing not included in the template is the small black circles for eyes which I just free-handed.
 I also made a fun scalloped flag bunting for the bulletin board. I think a banner is the perfect fun detailed piece to make your bulletin board (or any party decor) stand out. 

If you want to make a really easy banner, here ya go!
 Materials Needed:
4 inch letters (can be found at any parent/teacher supply store)
scrapbook paper
thick ribbon
stapler
scissors
Use the template to trace onto and cut flag pieces out of scrapbook paper. Tape letters on toward the bottom of the scallop (or glue if you're not planning on re-using the letters). Lay out the flags how you want them, making sure that you are consistent with which side overlaps. Fold the ribbon over the flags and staple. 
Leave enough on each end of the banner so you can make some type of bow. 
For this one I made a loop by just tying a knot and hiding the end inside the knot. 
But on my bulletin board for this year from my post yesterday I tied it in a bow. 
I hope you enjoyed today's Back to School post! 
Come back tomorrow for a great post from my wonderful kindergarten teacher friend!
Check out the other Back to School projects here
Photobucket
Related Posts Plugin for WordPress, Blogger...

invisible ad