PhotobucketPhotobucketPhotobucketPhotobucketPhotobucket

780x90

Hello! If you're new to Miss Lovie, I'd love for you to subscribe for free updates! You can subscribe by RSS feed or by email! Also be sure to follow on Facebook and Twitter for more Miss Lovie goodness!
Showing posts with label Dr. Seuss. Show all posts

Tuesday, February 25, 2014

Dr. Seuss Door Decoration: I Can Read With My Eyes Shut

Every year on Read Across America Day the Kindergarten, first and second grade classrooms at my school have a Dr. Seuss Door Decorating Contest to celebrate Dr. Seuss' birthday and encourage reading! It is definitely one of my favorite times of the school year. I know a lot of teachers celebrate Read Across America Day so I thought I'd share our door from last year featuring the book, "I Can Read With My Eyes Shut" by Dr. Seuss. 
I love this book! It really encourages kids to read by telling them about all the great things they can learn about and the illustrations (as usual with Dr. Seuss books) are great. 
"There are so many things you can learn about. BUT...you'll mss the best things if you keep your eyes shut." "The more that you read, the more things you will know, the more that you learn, the more places you'll go!" 
"If you read with your eyes shut, you'll likely find that the places you're going is far, far, behind...SO....that's why I tell you to keep your eyes wide. Keep them wide open...at least on one side."
We used the above Dr. Seuss quote from the book. It's a popular quote, but I love it. 
The kids and me are holding our own "books" they made themselves. I took pictures of them with funny glasses made from pipe cleaners on (that they also made) and then we colored and glued on some  Cat in the Hat bows and hats. So fun. 
Then I used the last quote from the book as well. I just love those cats winking at each other. Favorite part of the book.

Here's our full door. If you're curious about how to make the cute little books and the characters at the bottom, read on! 

Let's make the characters first. 
Use an overhead projector/document camera to project the picture you want to use from the book on the wall. 
Then, tape some paper the same color as the character (I used some fancy sparkly scrapbook paper) on the wall and trace with a marker-one that won't smear. Be sure to trace all the sketchy parts! 
Now we've got a cat! 
For any other parts of the pictures that are different colors, tape the different color papers on the wall and trace the parts that are that color. Fort he red, I traced the bows and stripes of the hat. Then cut them out and glue them on top of the character. Continue until all parts are complete! 

Ok, now let's make the kid pictures and their books. 
First you'll need to help your kids make some fun pipe cleaner glasses, and then take pictures of them and cut the pictures out like shown below

For each student they'll need a little book cover cut from some fun scrapbook paper and some little "hands". I just hand drew these to match the size of the photos. Easy. 
Your little book covers should look like this. 
If you want to have some fun, staple in some folded white paper and have your kids write their own books. 
This makes the books look a little more like a book, too. 
Staple the books to the pictures of the kids by pinching the books up and stapling the book to each side. 
And done. 

Add a Cat in the Hat bow and hat and you've got some cute "cat" kinders reading!

These would make great decorations or crafts for a Cat in the Hat or Dr. Seuss party, too, if you don't work at a school! 


Hope you enjoyed this post! If you're looking for more Dr. Seuss Door Decorations or crafts, you should check out my doors from the past couple of years, 

Happy Birthday, Dr. Seuss! 
I'll try to share what we do for this year soon. First I've got to figure out what we're doing.... Ha. 
Photobucket

Friday, March 2, 2012

Truffula Tree Kids Craft Tutorial and The Lorax Door Reveal!

Happy Birthday, Dr. Seuss! 
In this post you will find my Dr. Seuss classroom door decorations and a tutorial on a cute little Truffula Tree craft for kids! 
So I really really really love The Lorax book. 
It's such a great story. I was so surprised by how many people I've heard lately say they've never read it, too. Go read it! I am SO pumped for the movie to come out. I'm hoping to go see it soon! No, I don't have kids. Yes, I love animated movies. What?

When my hall at school decided to do a door decorating contest for Dr. Seuss' birthday I knew what book I had to do. the kids are actually supposed to pick their favorite....but, well, I kind of picked mine. Sorry kids. I knew they'd love my idea, though and since the movie was coming out, I thought they'd be at least a little more familiar with The Lorax, at least.  

So here's our door. The final product. :) 
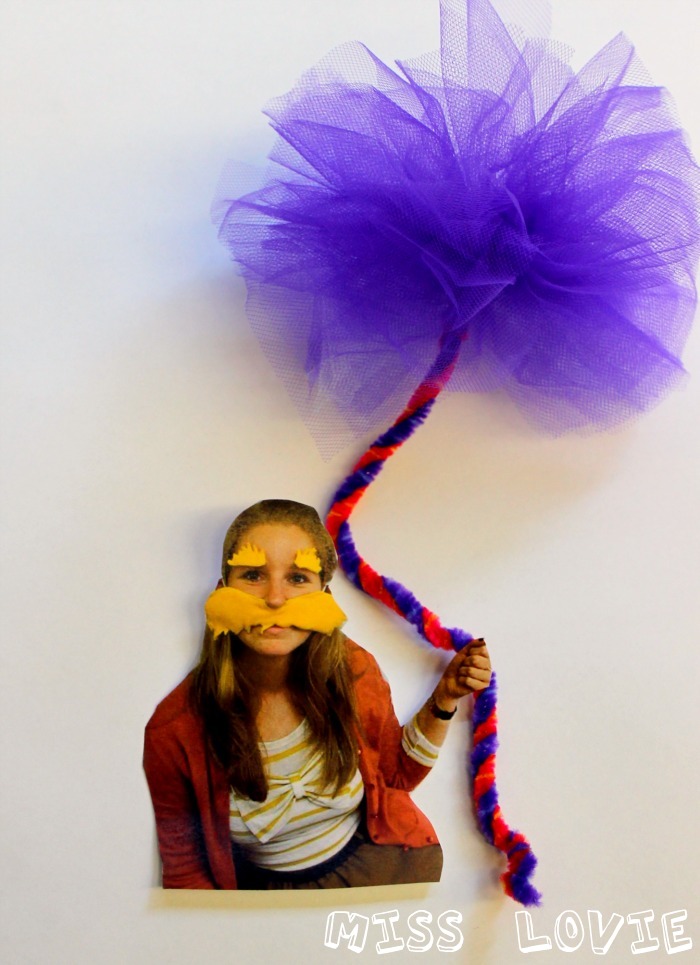
I'm kind of in love. It's hard to see (1. because it's hard to take pictures of an entire door, and 2. I don't have permission to show you the kids' faces anyway) but the pictures are of all my students with a Lorax mustache and eyebrows I made, cut out, holding their own Truffula Tree they made. 

Here's a close up of me on the door with my Truffula Tree
Keep reading! At the bottom of this post is a tutorial on how to make your own cut out and Truffula Tree! 
So the kids' pictures are way cuter than mine. One of my kids could totally pass as the Lorax. Hilarious.
We are all sporting this fabulous mustache and eyebrows. I found this tutorial and whipped it up the morning before school the day we took all the pictures. Instead of using a stick to hold up the mustache I used elastic. I figured this would be easier for the kids. Especially since they had to hold their imaginary tree in the photoshoot. 
I made the eyebrows for fun too. I made both eyebrows and mustache using no-pill felt (on sale!) the same way the tutorial says except I placed some card stock in between the two layers when sewing so the mustache and eyebrows would have more stability. I just used regular tape to attach the eyebrows. We just needed them to stick for the picture so it worked fine.  
I just love that Lorax guy. :) 
I traced both the Lorax and Onceler below using a projector with a black magic marker on construction paper. Then I cut them out and glued them in their spots on the door. I simply backed our Lorax friend with a strip of cardboard so he would stand up and pop out of the Truffula Tree. 
 The Onceler's window is actually purple like it is in the book. Not sure why it's showing up pink here.
I free handed the large Truffula Tree, and free-cut the letters of "The Lorax". The 3rd and 4th graders voted and we'll find out next Friday who won the contest! I'll keep you updated!
I hope you love it as much as I do! 

Click on over to my teacher friend's kindergarten blog, Ketchen's Kindergarten, to see more Dr. Seuss Door ideas! 
Now. Want to make your own little Truffula Tree? 
I know Dr. Seuss' birthday is over, but this would make a fun craft at a Dr. Seuss themed birthday party or just a fun craft after you go see the movie! 

If you wanted to get really crazy, you could make the Lorax mask and eyebrows like we did and take pictures and send pictures with truffula trees home with kids at a birthday party. How fun! 
 This craft is definitely easy enough for 5 year olds to make. Some of my kids had trouble fluffing the "Truffula tuft" at the end, but they'd get the hang of it easy with a little help
 Materials:
bright colors of tulle (I bought half a yard of 5 colors and it was more than enough for 20 kids)
2 pipe cleaners (the stripey ones came from JoAnn's)
Twist the pipe cleaners together.  

 Cut a 6x6 or 8x8 (depending on  how big you want your Truffula tuft to be) square of tulle. In the picture above there are about 8 layers. This is the amount I used for my kids. For the one I made myself (in this post), I used double that-16.
 While keeping layers somewhat together (it doesn't have to be perfect at all), fold it like a fan and keep it pinched. 
Fold the twisted pipe cleaners around the fanned tulle.  
 And then twist it closed very close to the bottom of the fan. 
 Please don't judge my chipping nail polish! 
 To create the fluffy Truffula tuft, pull out the layers of tulle one by one and fluff it! 
 To make the fun picture of you holding the Truffula Tree, take a picture of you (or your child) holding a pretend tree and cut it out. 

 Place the tree behind your hand, and voila! 
 To adhere it to our door, I used a glue stick for the picture and hot glued the Truffula Tree. 

Yay! 

Have fun making Truffula Trees! 
and remember, 
Thanks for reading! 

Linking to the parties on my sidebar.
Photobucket
Related Posts Plugin for WordPress, Blogger...

invisible ad