PhotobucketPhotobucketPhotobucketPhotobucketPhotobucket

780x90

Hello! If you're new to Miss Lovie, I'd love for you to subscribe for free updates! You can subscribe by RSS feed or by email! Also be sure to follow on Facebook and Twitter for more Miss Lovie goodness!

Saturday, January 11, 2014

15 DIY Jewelry Organizers and Displays

I'm always on the lookout for a great way to organize my jewelry that is also beautiful. I tend to have quite a bit of jewelry and I like it and wear it more if it's displayed. Currently I'm using three huge hooks I ordered from anthropologie.com several years ago and my jewelry box I got on a trip to China. All my necklaces fit on the hooks and I wear them often since they're right there so my set up is fine. It's just not as pretty as I'd like. I decided to look around and see if I could get inspired to create something else. I found so many cool things! Hope you love these 15 Jewelry Organizers and Displays! Check it out! 
Macrame Jewelry Display by Michelle at the Whimsy Box
So creative!!
DIY Jewelry Organizer by Laurel at The North End Loft
I love the colorful backing, tiny hooks that aren't distracting, and the little dishes at the bottom are perfect.
DIY Corkboard Frame Jewelry Display by Virginia at Live Love DIY
The colors in this frame are so calming and nice. They don't distract from the jewelry. 
Jewelry Board Tutorial by Beckie at Whippycake
Um. Wowzers. Someone make me this. Please.
Shadow Box Turned Jewelry Display by Brittany at Brittany Makes 
Love love love this beautiful shadow box display. It's gold and white- my favorite always. It wouldn't fit much, but if you had a huge dresser to sit is on top of it would be so cool.
Jewelry Organizer by Liz Marie at Liz Marie Blog
I thought the different drawer pulls were cool. 
Gold Tree Jewelry Display by the Color Buzz Blog
This is really unique and the tutorial is great!
DIY Jewelry Tree by Ashee at My So Called Crafty Life
I love the vase. What an EASY make.
I LOVE the bright white frame and backing. The little tray is genius. 
Unconventional Jewelry Display Ideas by Shannon at Artemis and Apollo
Candlestick + plate. Cute. There are more really cool ideas in that post too! 

Dinosaur Ring Holder by Laura at The Band Wife
Cue the Dinosaur Jewelry Organizers! I have no idea why there are so many dinosaur jewelry organizers on the web, but there are and I think it's kinda cool and really hilarious. The gold and white makes this one very cool and the gems on the dish are fabulous.
Dinosaur Jewelry Organizer by Maria on The New York Mom
This could be a cool hook fixture for other things, too. Again, the gold caught my attention. 
Pretty Prehistoric Ring Holders by Ashlee at My So Called Crafty Life
These are crazy! The colors are so fun and again-hilarious with the dinosaurs.
Jewelry and Accessories Station by Desiree at The 36th Avenue
This peg board was well-designed and looks really functional!
DIY Jewelry Bust  by Grace at The Design Sponge
I pinned this forever ago because it's so fun. I don't have a jigsaw, but if I did, I'd make this for sure. Free template included!

I hope you enjoyed these ideas! How do you organize your jewelry? I'd love to hear about your ideas! I need some pointers. 

If your project was featured, feel free to grab a button!
Miss Lovie Creations

Thanks for reading! I hope you're enjoying your weekend!

Photobucket

Monday, January 6, 2014

Miss Lovie: 2013, A Year in Review and Goals for 2014

Today I wanted to round up a few of my favorite projects here on Miss Lovie from 2013 for you to enjoy again. 
I did create lots of jewelry for my contributor posts on 30 Handmade Days so you should definitely go check those out, too!
Here are some of my favorites!
1.Just Chains Necklace  2.Winter Brights Necklace  3. Baubles and Beadcaps Necklace 4.BHLDN Knockoff Bridal Earrings 

So somehow there are only five favorite projects from Miss Lovie. Hm. How did that happen?!
Here's a little hint.


All photography by Honey Heart Photography

Yeah. A wedding takes up a LOT of time. Especially when you have these grand ideas of a beautiful handmade wedding which you plan and do (almost) all on your own. And yes, I'll share more wedding photos soon! :)

The time I would usually spend blogging was completely taken up with wedding planning, crafting and sewing for the wedding, teaching full time, and spending time with family and friends. I spent a lot of time creating this year, but unfortunately, wasn't able to share most of it with you since it was almost all for our wedding and I wanted it to be a surprise. Lucky for you, I took pictures along the way and plan to share a few DIY wedding ideas on the blog in 2014! Woo!

So while 2013 was an incredible year for me personally (my (now) husband graduated law school, he started a new job, we moved, we planned and had a fabulous wedding, we planned and went on a perfect honeymoon, I cooked a more at home and tried to did more yoga!), it was honestly a little lackluster here on the blog. With that said, I have high hopes for 2014. 

I want to...
Create and blog on a regular basis!
Sew more, broaden my sewing skills and explore using sewing patterns. 
Learn how to make a Quilt.
Continue to make jewelry on a regular basis.
Do more home DIY projects.
Take more photos and improve my photography skills.
Clean up the blog and maybe do a redesign!

Is there anything you'd like to see more of here on Miss Lovie??? I'd love to hear what you think!

Here's to a great year!
Thank you so much for reading. I appreciate you so much. 
Photobucket

Monday, December 30, 2013

Easy Sew Dog Dress

 I am aware Christmas is over, but I just had to share this Easy-Sew Dog Dress with you guys!

We took our honeymoon over Christmas, even though our wedding was at the end of October (teacher problems), so I was scrambling to get Christmas gifts finished and delivered before we left which gave me no time to post these pictures of our cutie dog in her fancy new dress. 

I used the Sweet Pea Dog Dress Pattern that I purchased from the Etsy shop, Sofi and Friends and it turned out so cute! 

Confession: until now I had never used a real sewing pattern before. Truth. I've sewn quite a bit and have posted several projects here like my faux chenille baby blanketCrinkle Tag Baby ToyEasy DIY HammockTravel Felt Board and more, but they have all been sewn using online tutorials (aren't blogs the best?!) or just ideas I came up with. 

But after taking a Pattern Reading Class at our local Sewing Shop, Sew Dayton (a great place for designer and vintage fabrics and notions and sewing classes if you're in the Dayton, OH area!), I felt ready to tackle a real pattern. As Jesy at Sew Dayton, suggested, I started with an easy pattern. The  Sweet Pea Dog Dress Pattern was perfect. It had easy to read instructions and pictures that helped guide you. I highly recommend any patterns from the Sofi and Friends shop!
Plaid probably wasn't the easiest choice of fabric because of all the lines that should be straight/match up, but I couldn't help myself. Somehow we already had a bow to match. It was fate. 
I sewed this dress for our dog, Nix, in a few hours before leaving to go to a Tacky Sweater Christmas party with friends. I thought about adding some ridiculous trim or applique to the dress to make it a "tacky" dress, but I wanted her to be able to wear it throughout the Christmas season. While Nix is fancy, she is also practical. 

The pattern comes with instructions on how to add a band to the middle of the dress and a bow, which would have been a nice touch, but I ran out of time. 
The  Sofi and Friends shop makes patterns for small dogs and Nix is a shih tzu so she's more medium sized so I purchased the XXL size. It felt weird because I don't feel like she's XXL, but I went by the measurements laid out in the listing. If you plan on purchasing the pattern, be sure to read that part carefully and measure your dog. 
It's even lined. So fancy. 

For my first sewing project from a pattern, I'm feeling pretty proud of myself and ready to tackle new things. 
I hope everyone had the best Christmas yet and are enjoying time with your friends and family! 
Thank you so much for reading and I look forward to sharing more with you soon. 


Photobucket

Thursday, November 21, 2013

Can't Get Enough Orange Necklace Tutorial

Hey Miss Lovie readers! Today I'm back over at Thirty Handmade Days with another jewelry tutorial, my Can't Get Enough Orange Necklace! 
 I am LOVING this one. Maybe it's because I'm obsessed with orange right now. 
Click on over for the full tutorial

Photobucket

Sunday, November 10, 2013

DIY Fabric Heart Fall Bunting with Free Template


I know. Fall is over, I guess. But it's really not, people. I know the department stores, your neighbors' house strung with lights, Pinterest, and all the bloggers ever are insisting it's Christmas already, but it's actually not winter yet. We haven't even had Thanksgiving!! Believe me, I'm tempted, just like you, to stay up until 1 am decorating the Christmas tree almost every night of the week these days, but I refrain. Why? Because I love pumpkins. I can't bear to throw them away yet. They're not even rotting. Also because of Thanksgiving. 

I thought for just a minute I might be hosting Thanksgiving this year for my family, and even though I'm not now, I decided to decorate my mantel for the holiday. More on that in this post! I knew I needed a cute flag bunting to hang. Luckily I had already made this sweet fabric heart one for our rehearsal dinner before our wedding a couple weeks ago! I love it when I can reuse decorations for different occasions.  
Here it is on our Thanksgiving Mantel
Sadly I don't have any quality pictures of it on the mantel at the Rehearsal Dinner. It was pretty cute there, too. 
Want to make a sweet fabric heart bunting for your house, too? 

Of course you do, this could be used for ANY holiday or season- not just Fall or Thanksgiving. Think pink and red patterned fabrics for Valentine's Day, plaids and reds and greens for Christmas, or your child's favorite colors for their birthday! Bam. Most versatile bunting tutorial ever. 

Let's go. 

Gather Materials:
 Glitter scrapbook paper, Kraft card stock, twine, fabric, hole punch, scissors, a pen glue and 

Create the Flags.
 Print the templates onto card stock and cut out. Use templates to trace and cut the flags onto the paper and then glue. I made 12 flags and this made my bunting about 5 feet long. 
 Trace and cut the hearts into the fabrics.
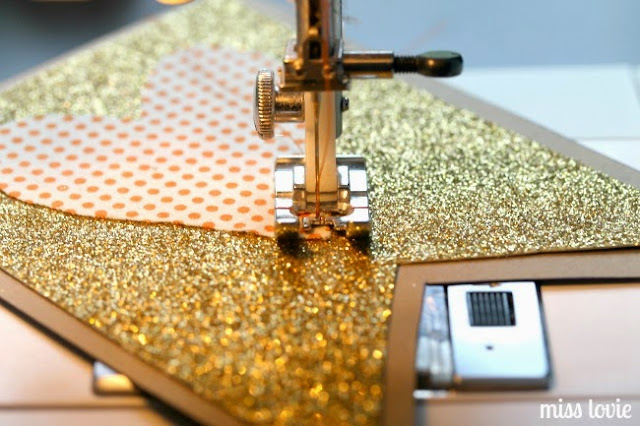
 Sew the hearts onto the flags. I didn't pin these or anything because it's difficult to do through the paper so the fabric will shift on you some. I found it easy to sew one side of the heart and then turn the paper while the needle was still down, sew back over the side I had just sewn and then sew the other side. After a little trial and error, I found that this decreased the amount of bubbles in the fabric. It may not be totally flat, but that's okay. I then sewed around the heart another time or two to create a kind of sketchy outline as you can see in the photo below. 
You finished a flag! Repeat however long your hear desires.

String the Flags.
 Use a hole punch at the top of the flags as shown and thread the twine through, starting at the back, allowing the twine to sit on top of the flag and then threading it to the back again. 
 Hot glue some bows onto each side if you like and you're done! If you like, you could put a tiny dot of hot glue on the back of each flag and press the twine into it once you have it placed where you want so the flags don't slide around. I didn't do this in case I want to use the bunting somewhere else and space the flags out a little more. They don't really move too much once you've got them hung. 
If you loved this tutorial, be sure to go check out my Thanksgiving Mantel as well! 

Thanks for reading. It's good to be back. I hope to post a little more regularly now that the wedding is over. More diy wedding tutorials are definitely in this little blog's horizon as well. 
Happy Holidays!

Photobucket

Thanksgiving Mantel and Fabric Heart Bunting

Hello, Miss Lovie family! 

My wedding was a couple weeks ago so now I am back to blogging as usual,  I hope! Today I have my Thanksgiving Mantel for you! I know a lot of you are already decorating for Christmas, but bypassing Thanksgiving is just so sad! And so is throwing away pumpkins before they're done. I love pumpkins and mine are still kicking so a Thanksgiving mantel it is. My tree can wait a few more weeks before it goes up! 

I hope you enjoy my mantel. We started renting this old home in a historical district back in May of this year. We've been so busy since that I'm just now getting the chance to decorate this beautiful fireplace for real. The mantel itself is very narrow so that brought a bit of difficulty finding pieces that would fit up there, but I found a few things just around the house that worked well. 

 Mr. Lovie and I bought the old windows off Craigslist and got a crazy awesome deal for them along with a few others. They were originally intended for wedding decor, but I'm so excited they double as decorations for our home! 
These awesome Reader's Digest books came from a yard sale. I love the colors in them so much. They tend to be the item that ends up in every room when I move items around to decorate because I love them so much. 
The chalkboard frame came from Home Goods and I think the frame was originally blue? I spray painted it gold and used it in wedding decorations as well. I used this chalkboard art tutorial. It is so easy. Those who know me well know I cannot do pretty lettering on anything! 
Everything in this mantel design was done with things I already had so that was really exciting. I love saving money. 
Love my fabric heart bunting? Find the tutorial and free template here

Pumpkins! These were left over from our wedding as well. 

Thank you so much for reading! 
I am definitely thankful for you!!
I hope you have a very Happy Thanksgiving and a fantastic holiday season!
Photobucket
Related Posts Plugin for WordPress, Blogger...

invisible ad