Ready to see how to make this chain-wrapped
rosette as seen on my Lavender Rosette Necklace?
I first got the inspiration to make these rosettes after seeing the beautiful Etsy Shop,
Studio Elenus. You seriously should check it out. She has beautiful things. After seeing the chain-wrapped rosette on her shop, I knew I had to figure out how to make it.
I'm really loving these rosettes and am wanting to make a ton more and put them on everything.
What? You feel the same? Ok let's make one!
Step 1: Gather Materials
I used a piece of rough silk 4"x45". The size of your fabric depends on how big you want your rosette, so adjust as necessary. At first I started out with chain the same length as my fabric, but soon found out it was not nearly long enough. I would recommend using chain twice the length as your fabric. If you dont place the chain on every fold (as seen on the orange rosette at the end of this tutorial), you won't need as much.
Step 2: Fold and Create the center of the rosette.
For a clean look on my rosettes, I always fold both sides into the center and then tie a knot. This makes the rough edges stay on the inside so that when you twist and fold you only have nice crisp folded edges and not rough edges. I really like the rough edges sometimes, but when a clean look is desired, this technique works great!
This is how you would start a rosette without the chain. See the rough edges turned in?
To add the chain, turn in edges and lay chain on top.
Tie knot as usual. Trim excess.
Step 3: Twist, Fold, Glue, Repeat.
As you can see, I twist the fabric once, and fold down on top of the knot onto a tiny dot of hot glue. I continue that process until the rosette is as big as I want it to be. I like the look of this type of rosette a lot more than the twisting and rolling. The first few folds are pretty easy because the folds are small. Be sure to hold the chain tight. As you can see in the picture above the chain hangs down behind the rosette after each wrap.
On this lavender rosette, I placed the chain on top of each fold. In order to do this, pull the chain up from the back and lay on top of the fold.
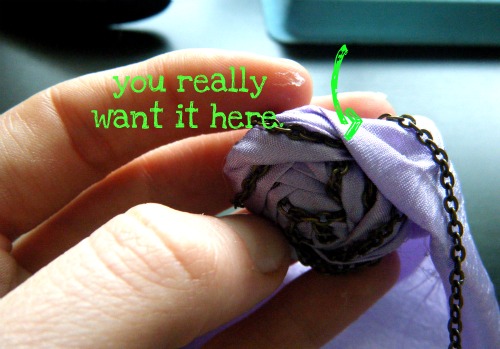
Once your rosette gets bigger, your chain won't automatically lay in the ideal place on top of the fold anymore as you can see above.
To fix this. Glue it down in the back up to the place you want the chain to start. So now instead of the chain being way over on the outer edge of the fold, it is more on the inner edge so it will be seen.
Much better.
(Forgot to take this picture when I was making the lavender one.) In order to keep the chain nice and tight and flush against the fabric without any slacking, pull down the chain with your left hand and use your right hand to twist and fold the fabric down on top of it.
Put a tiny dot of hot glue under where your fabric is going to lay and press down. I put a tiny dot of glue on every fold.
Continue until it is the size you want.
Then fold the edge onto the back and glue down.
Step 5: Cover the Back!
The back will be covered in glue from where you had to glue the chain down several times. Be sure to cut a circle of felt the same size as the back of the rosette to glue on the back to hide all that mess.
Step 6: Add them to everything!
Attach it to jewelry, picture frames, belts, brooches, purses, and....
shoes?
I made this orange one to show how to put the chain on every few folds instead of every fold like I did on the lavender one.
In order to do this, simply leave the chain hanging in the back for a few folds instead of placing it on the top of each fold. I can't decide which style I like better.
I do think that I need to make another one, though and make these into shoe clips!
They maybe could stand to be a little smaller...oh, well.
I tend to like things a little over the top sometimes.
I'd love to see yours if you make one! Upload it to my Flickr page and I'll feature you!

Hope you enjoyed the tutorial. Thanks for reading!
Linking to
these parties!












![[justme.jpg]](https://blogger.googleusercontent.com/img/b/R29vZ2xl/AVvXsEiqDNFDwxI6UXStIPlD5WSiuSfBl1G4-bWvgy2hzXnFBbYMMhCBOID0hpSgP7nc0MY-a_heok9HhY2kDBNgxyOSgWQhP7y5ZoI4JG1fha5KzGIo-_7WffgfOpH2tNlKnaOUby1QEhyJILo/s220/justme.jpg)


