PhotobucketPhotobucketPhotobucketPhotobucketPhotobucket

780x90

Hello! If you're new to Miss Lovie, I'd love for you to subscribe for free updates! You can subscribe by RSS feed or by email! Also be sure to follow on Facebook and Twitter for more Miss Lovie goodness!
Showing posts with label Women's Clothing. Show all posts

Saturday, December 24, 2011

Ugly Sweaters and A Merry Christmas!


 Merry Christmas Eve!!!
In honor of Christmas I thought I'd share with you  my love for ugly/tacky Christmas sweaters and attire. I present to you this year's sweater and outfit.
 Wow, right? The cool part? Mr. Lovie picked out the whole outfit from our local Goodwill the day before knowing I could craft it into a great ensemble. The right sizes and everything. How good is he?!
 I may have woven that red plaid ribbon in throughout the holes from the knitting in the sweater and tied the bows in the front. And I may have done it in the car on the way to our party. What? haha.
 And of course I made the bow on my headband and my shoes.
 My speedy bow tutorial will come soon. I made all three bows in less than 15 minutes. Speedy, huh?
Here is Mr. Lovie and I in front of the tree at our friend's party... 
Lovely, yes? Good and ugly. :)
 
Of course Nixon Girl had to come. In a sweater. And her very own bow.
 The ugly/tacky Christmas sweater party started several years ago when my wonderful friends and I somehow managed to all live in the same apartment complex the year after we graduated. (Seriously, at one time there were 14 of us living in the same complex. It was so fun.) The picture above is most of us. Love this picture. It was clear that the tradition just had to continue. Even though we all live all over the place now, we still try to make it happen.
 And here's the skirt! Bonus! It's really cute! It's a wool skirt so it's nice and warm and it's a beautiful shade of bright red! Merry Christmas to me!
And it has pockets!! Woo hoo!! I just love great thrift store finds!

I hope you are having a great Christmas and enjoying this time with your families. I won't be posting this next week most likely as I am with my family and friends back in Lexington, Kentucky. I'll see you for sure after the new year! Merry Christmas!!

If you're still wrapping presents check out my Christmas Bow Tutorials!! Your presents will be gorgeous in no time!
Need a super last minut gift check out my Pretty Packaged Christmas Candy!
 Photobucket

Sunday, July 10, 2011

T-shirt Refashion: Fancy Ruffle Tee


Yay! My first (successful) t-shirt refashion! It's kinda hard to believe that's actually true when I have probably a billion t-shirt refashion ideas bookmarked. I've somehow not done any of them yet. Too many crafts-not enough time. Story of my life.  

Hope you enjoy reading about my version!
I got my inspiration from this cascading ruffle on this dress  done on Grosgrain's Frock by Friday Series
I wanted the ruffle to start up on the shoulder and cascade down. I did make it like that, but then it didn't quite work out. Read on to see what I did instead and to make one yourself!

Materials needed:
1 t-shirt- I got mine on Target special ($8 or $9?)
1/4 yd of cotton, 1/4 yd of gray tulle, 1/4 yd of lace
Sewing essentials
Step 1: Make ruffle(s)
I added the (s) because my original plan was to make only one ruffle, but I ended up needing a couple more. Make what you need. You'll see what I mean. 

To make the large cascading ruffle: Cut a 4.5inx28in strip of gray cotton, a 4 in. strip of tulle, and a 3 in. strip of lace. Fold all these in half and press each one separately. Set aside lace and tulle strips. Create a tube out of the gray strip. (To see how to make a tube go to Step 4 of my tutorial and use the directions on how to make a tube there). 

Once the tube is created, zig zag the edge of the tube that is opposite the seam. This part is optional, but it adds nice texture.
 Take the folded tulle strip and put it around the gray strip with the seam nestled inside the fold of the tulle. Pin as you go being sure the gray is flush against the tulle.
Do the same with the lace. 
Using a 1/8 seam allowance, topstitch to hold the layers together, removing pins as you go. Then stitch again to ruffle the strip, but with a 1/2 in. seam allowance and change the setting on your machine for ruffling (set tension as high as it will go and stitch length as long as it will go.)
Step 2: Pin ruffle to shirt and sew.
Pin the ruffle wrong side down to the top of the shoulder.  
Sew across the top 
and press down. 
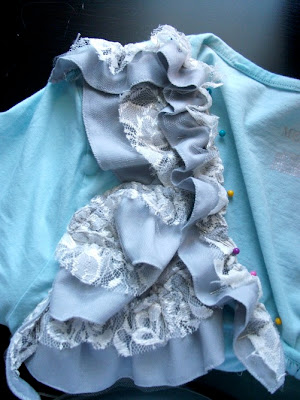
Create a zig zag pattern by folding ruffle on top of it self each time it is turned. Pin so that the ruffle looks as if it is cascading.
 Sew ruffle down. 
 When you come to a spot where the ruffle is folded on itself, keep the needle down in the fabric and rotate the shirt and sew the ruffle down. 
 Here it is with only one ruffle. It looks okay off, but when I put it on, it was totally weird looking.
The ruffle at the top was not ruffly enough and the other parts of it looked weird. 
Plus I sewed part of the collar to the ruffle on accident and had to pick it out thus creating a hole. Awesome. I almost tossed this shirt in the "to be turned into something else pile". But then I thought, "More ruffles is always better, right?" and made a couple more.
If yours looks weird, too, create 1 long thin ruffle that will start at the top of the shoulder and then all the way down the collar (to cover up that hole) and anther tiny one (not shown in the picture above) to go on top of that piece at the top that wasn't ruffled enough. Just added ruffles in the empty spaces or in the spots that looked strange. To make the thin ruffles adjust the measurements of your strips. The length should always be almost twice the length of where you want your ruffle to go. The gray strip should be 3  in. wide, the tulle 3 1/4 in. wide, and the lace 2.5 in. wide. 

Step 3: Look cute. Yeah. 
Turns out, I like the final product better than my original vision. 

Hope you enjoyed the tutorial. 
Also check out how to make the lace and pearl earrings I'm wearing here
Send me a pic if you create your own Fancy Ruffle Tee! 
Or add it to my flickr page.

Linking to these parties.

Wednesday, July 6, 2011

Refashion #1: Ankle and Granny to Awesome and Trendy

I'm so excited about my first refashion!
One of my favorite things to find on blogs is a refashion section. I am always so amazed that people can take something hideous and make it something beautiful, like taking a $3 skirt at your local thrift store and turning it into something that would sell for $35 at your local mall. I'm equally amazed by those who can miraculously find these old beat-up pieces of furniture at flea markets and thrift stores, see potential in them, and recreate a gorgeous piece for their home. 

If you love decorating and re-designing furniture, or want to learn, please go immediately and see Brooke at All Things Thrifty. She does super incredible things and then tells you how you can do it, too. Things like this:
and this:
and this incredible-ness:
Go over there and learn something. I do every time I visit her blog.

 The first time I really took notice of the idea of going thrifting and refashioning clothing was when I saw the section Kathleen had done on her website, Grosgrain, called Thrift Store Thursday where she shows you how she took things from thrift stores and reworked them into something else. I fell in love immediately.
Here's some of her fun refashions:
 Browse through Thrift-Store Thursday section of her blog. You'll love it. 

Another great blog that is fully dedicated to refashioning that I recently found is C&C or Cotton and Curls
Here are some of her fun refashions:

She also has a page on her blog where you can link up your blog called Refashion Nation if you refashion anything! I'm sure there are lots of great refashion blogs out there you could check out.

So when I see the inspiration, I bookmark it or "pin" it all because I think, "Someday I will do something like that!" Unlike many things I bookmark that I forget about or don't make time for, the day has come. I have done a refashion from a $3 ankle granny skirt. 
And. I. Love. It. 
Consider me officially addicted to refashions. I have 2 more pieces of clothing waiting to be reworked.
 When I saw this pattern at the thrift store I knew I needed it. It was fun and a great shade of turquoise-y green. The feel of it is slick and it's thin-I'm sure it's some sort of cheap poly blend or maybe just straight poly, but it feels cool on hot summer days like today.
 And of course the best thing about elastic skirts is you can wear them anywhere on your waist (high or around your hips) if you don't make the elastic part too tight. 
This is my favorite kind of outfit. I could make 20 more of these and be in heaven. 
I kinda used this 20 minute skirt tutorial from Ruffles and Stuff. I strayed from it some and probably shouldn't have since my seam is not super straight (thus the reason for no super close-ups of my sewing handiwork.) I consider myself a pretty novice sewer still and will definitely make more of these to get better at it. 

The best thing about this skirt re-fashion is that it was super easy (even though I managed to screw it up a little-not that you can tell though, really). I simply cut off the top elastic, picked out the seams with my seam ripper (not the bottom hem!!!), and then followed Disney's tutorial! I used the existing hem already in the skirt so I didn't have to re-do that part. Fun and easy. Yay.

Thanks for reading and go do some thrifting - you never know what you'll find that could turn into something awesome!!

Related Posts Plugin for WordPress, Blogger...

invisible ad