Hello, all!
Welcome to Creepy Crafty Halloween at Miss Lovie!
Today I'm sharing my Halloween tutorial, but be sure to check back all week next week and then through the beginning of the next week for some more great Halloween projects and tutorials by these lovely ladies: Tidbits from the Tremaynes , Oopsey Daisy, Naptime Crafters, Kiki Creates, Teach, Craft, Love, Delia Creates, A Glimpse Inside, and
What do you think of my Batty Table Runner?!

I'm kinda loving it.
It's made almost the same way as my Ruffles and Hearts Table Runner from Valentine's Day seen here:


So spooooky! Ha.

I had a little fun with some pumpkins, too. It's so easy....add Mod Podge to the stem, coat on the black glitter, and hot glue some ribbon and trim on and you've got the cutest pumpkins everrrrrr.

I don't remember where I saw the ribbon-wrapped pumpkins or a pumpkin on a candlestick (probably on Pinterest), but I love it!

OOOOOooooooooOOOOH!
Have you seen these in the Martha Stewart Crafts section at Michael's? Make your own with the bat template, a little Modge Podge, and glitter!
Ok! Ready to make your own spooky batty runner?!
 Here we go. This table runner is super easy. It is a little time consuming though. Some of it you can do sitting in front of the TV, though!
Have you seen these in the Martha Stewart Crafts section at Michael's? Make your own with the bat template, a little Modge Podge, and glitter!
Ok! Ready to make your own spooky batty runner?!

1. Gather Materials:
1 1/2 yds. (or more depending on how long you want your runner) of orange burlap
1/2 a yd. of black felt, 2 different black printed fabric,
1 yd. of spooky black lace
A little under 4 yds. of sequin or other fun trim
Pellon Wonder-Under (or any fusible interfacing)
Good scissors and other sewing essentials
2. Cut Runner Pieces.
Your measurements may change depending on where you're planning to place your runner. I'm putting my runner on a console table. My table is 15"x48" so I cut 2 pieces of orange burlap into 13x54 inches. This gives me 5 inches of runner on each end (for the ruffles) and it will be almost as wide as the table with an inch of table on each side of the runner if I placed it in the middle.
3. Cut out your bats!

You can do this part while watching your favorite show!
Copy the bat template onto a word document and resize it several different times to create different sized bats. Print out the template onto cardstock and cut out. Fold fabric in half and pin the center of the template to the fold and cut.
In order to make the 2 sided fabric bats, fuse a large piece of the fabric together following the directions on the package of the Wonder Under. Then fold the fabric in half like you would any other fabric, pin the center of the template to the fold and cut as usual.

Copy the bat template onto a word document and resize it several different times to create different sized bats. Print out the template onto cardstock and cut out. Fold fabric in half and pin the center of the template to the fold and cut.
In order to make the 2 sided fabric bats, fuse a large piece of the fabric together following the directions on the package of the Wonder Under. Then fold the fabric in half like you would any other fabric, pin the center of the template to the fold and cut as usual.

I cut way too many bats. Which means I'll have to do another project! You really only need about 15 in each different fabric in various sizes.
4. Pin and Sew
4. Pin and Sew

Start pinning first line of bats in the center of one piece of the burlap. (You'll sew the other piece to it later). When pinning the bats, start 1 1/2 inches from the top and pin a bat and then pin one 1 1/2 inches form the bottom and pin one. Then space out the bats in between. Use 5 bats in each row.

Line up the center of each bat with your ruler.

All pinned.

When you go to make another line of bats, measure where the middle of that line should be by placing the largest bat a half inch away from a large bat in the line already pinned. Where the middle of that bat lands should be your middle for the next line.
Work your way out. I ended up with ____lines of bats.
Work your way out. I ended up with ____lines of bats.

When you get towards the end, leave 5 inches on each end to sew the ruffles.

Sew a vertical line down the center of each line of bats with black thread. Start and end the vertical line 5/8inches away from each edge so the lines will match up with your topstitch seam later.

This part is optional, but it might help the runner have more longevity. Tack down the wings with 3 or 4 stitches (and backstitches) on each side.

I did not cut the thread between each wing and just went back and cut all loose threads after I finished sewing.

When all the bats are sewed on, pin the second piece of burlap to the one you pinned the bats to WRONG sides together. We're just going to topstitch.

With a 5/8 inch seam allowance, sew all the way around the 2 pieces of burlap.

I kept the black thread for this step, but you could switch to a matching orange if you want. It doesn't matter either way.

To add some pizazz, let's sew on some sequins!! I found this zig zag sequin trim and it turned out perfect, I think! Sew the trim on top of the stitching onto the top and bottom of the runner (not the ends).

Start and stop sewing the trim a couple inches after the last line of bats on each side (the ruffles will cover this part). To secure the sequins well so they don't fray, tuck the trim under itself once and sew it down, then sew a line perpendicular to secure it even more.
5. Create Ruffles and Sew

5. Create Ruffles and Sew

Cut 8 strips of spooky lace 4"x54" (or whatever the width).

Ruffle the fabric by using a 5/8" seam allowance with your tension set to the highest setting and your stitch length set to the longest setting.
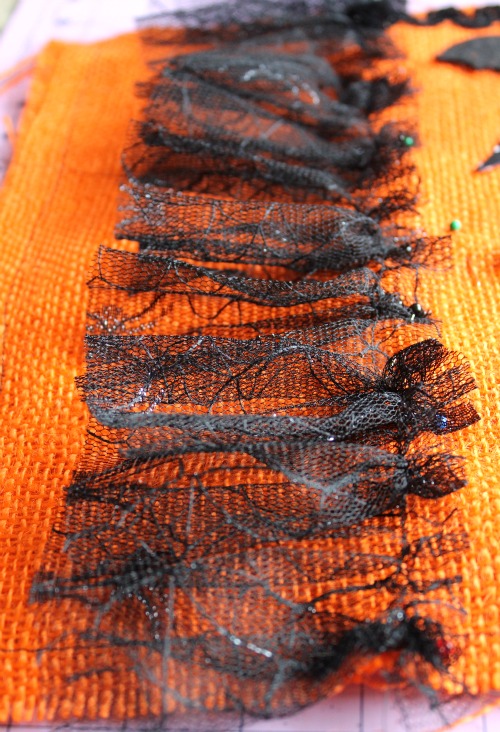
Pull the thread on each end and make the ruffles tighter until each ruffle is the same width as the runner. Pin the ruffle about a half inch away from the last line of bats.

When the first ruffle is pinned, fold it back, and pin the next one directly under the pins of the last one.

It should now look like this when you fold it back down. Continue those steps until you have 4 ruffles on each side.

Sew down your ruffles starting with the top ruffle along the stitching from creating the ruffle. Be careful that you remove all pins as you sew and don't sew over any pins from the other ruffles.

When the first ruffle is sewn down, fold it back and sew down the one underneath it. Continue these steps until all 4 ruffles are sewn down.

Sew the remaining sequin trim on top of the first ruffle along the stitching.

Spooky Ruffles! Who would have thought those existed!!

You will inevitably have this problem on the left so get your lint roller out and clean up those bats. Burlap gets everywhere!

Then throw it on the table and create your display!
I hope you love it as much as I do!!

Thanks for reading!!
Be sure to come back tomorrow for a great post by one of Our Creepy Crafty Halloween guests!
It's going to be such a fun week!
Linking this project to the parties on my sidebar and The Idea Room's new party!
Oh! And have you entered this giveaway?!! Go win this cute Boo! Bunting!