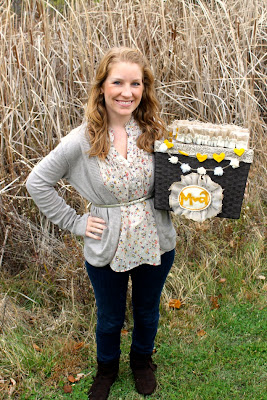
This blogger, Shannon, planned and paid for dates in advance so she and her husband wouldn't waste time wondering what to do for their date night. They just picked an envelope and went! I loved this idea. After Matt went crazy and bought us an awesome new couch for our anniversary, I knew I had to do something special for him, too. So I made us a Date Night Basket! In the original post, Shannon actually made one date for each month and labeled them accordingly, but I wanted ours to be more flexible, so I just labeled them 1, 2, 3, etc. and I only did 8 because I was pressed for time/that was all I could think of for the moment.
And I, of course had to embellish the basket and envelopes a little with ruffles, hearts, garland, and embroidery.
Each envelope had a double felt and burlap ruffle.
Then inside each date envelope, there is an info sheet describing the date along with gift cards, cash, and anything else we would need to go on the date described.
Here's Date #7, I believe.
I used the photo flyer template in Microsoft Word 2010 to create all the info sheets inside each envelope. Each one had different color schemes, descriptions, and pictures to match the date.
Want to make your own Date Night Basket??
Let's do it.
Materials Needed
Large envelopes
Basket (I got mine at target on sale!)
Microsoft Word (some sort of flyer template that allows you to insert pictures and add descriptions)
Gift cards or cash, and anything else needed to prepare for the date
Fabric for ruffles, garland, and sign on front of basket (burlap, felt, and tulle)
Mod Podge (or other glue to adhere the labels to the envelopes)
Embroidery thread and needle
Hot glue gun
2 pin backs
Sewing essentials
Plan Your Dates
If you decide to make your own Date Night Basket, remember: the dates don't have to be elaborate and can even be free! One of mine was Late Night Coffee/Catch up on DVR Date and I threw in some fun coffee flavors.
I found lots of date night ideas
here (site found via
pinterest again. My favorite thing to do on there is type in what I want to the Pinterest search and I find the coolest stuff!). Some of her ideas are a little too much for Matt and me, but I did use her
book store date idea for Date #7 above (it even has free printables that go with it).
Flea Market Date. Ha. There's a huge one close to us and we've never been so...
On the date nights I planned for us to actually leave the house, I had a gift card or cash ready for however much we would be expecting to spend there. I tried to pick things that we either haven't done or don't do that often.
Once your dates are planned, and materials are gathered, create your word docs for your info pages and print them on a color copier. I took mine to a Fed Ex Express and had them printed.
Don't forget to print your labels, too, for the outsides of the envelopes.
Here's a sample of the labels I created for the envelopes:
You can download your own Date Night Labels
here.
Cut and Mod Podge your labels onto the center of each envelope.
Then create a ruffle for each envelope (cut two fabric strips, both should be as long as double the width of your envelope, one thinner than the other and ruffle them at the same time) and glue on. For a more detailed post on how to make double ruffles and glue them on, see
this post.
Embellish the Basket
There will be a post later about the heart and pom garland seen on this basket. For now let's make the fabric label for the basket.
Create a wide ruffle.
Cut two strips of fabric about 48 inches long and 5 inches wide, stack them together, and ruffle down the middle. I used tulle and burlap
Form the ruffle into a circle so that the center of the circle is all touching.
Sew right sides together and set aside.
For the oval in the center, cut two ovals of felt and cut out your message for the center in a contrasting color of felt. To stitch the message on, I used an embroidery
running stitch with 2 strands of embroidery floss.
Once the message is stitched on, stack the ovals on top of one another, wrong sides together and do another running stitch around the outside border. If you want, you can stop here.
I wanted my border to be a little more fun so I added in a
looped running stitch. The tutorial for this says to use contrasting thread for the looped thread, but I stuck with the gold.
Once all your stitching is complete, hot glue the oval to the center of the ruffle circle.
Trim any fabric that sticks out too far and you're done!
I wanted to attach the fabric label to the basket without ruining the basket in case I ever wanted to reuse the basket for something else. I figured out that if I stuck a pin in through the weaves it would stay, so...
I hot glued two pin backs onto the wrong side of the fabric label in the places I knew they would need to go in order for the label to be centered an in the right place.
Hang it on the basket (don't worry about clasping the pins- they'll stay) and you're done!
If you make little garlands like I did, you can pin them to the fabric lining of the basket just inside the rim of the basket in the front. By doing it this way, you can detach it anytime you want to use the basket for something else.
Give it to your love and watch him be super surprised. I love this idea, too, because once the dates are all done, you can always fill the envelopes again!
And even though I made this for my love for our Anniversary, how much fun would this be as a Christmas present?! Or birthday?!
I hope you enjoyed the tutorial! Thanks for reading!
Linking to the parties (including
here and
here and
here) on my sidebar!


