Ok, be warned this is a long {and awesome} post. :)
I've been a gift wrapping machine this past week. Mr. Lovie has been spending lots of time at the library due to finals so it has given me time to get my wrapping done (without him peeking!).
Ready to make some of these??!
Or these?!
I LOVE wrapping gifts. Making bows is like a second nature to me because I have done it A LOT. In high school and through college I worked at Horne's of the Bluegrass, a gift shop in Paris and Georgetown, Kentucky and I attribute all my bow-making skills to Carolyn, a wonderful lady I worked with there. We wrapped hundreds of gifts during the Christmas season so I became quite the skilled bow-maker! I am now going to share those wonderful bow-making skills with you as well as some other super fun bows that I came up with.
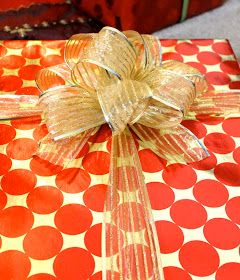
First up is the Fancy "department store-type" bow. This is the bow I learned to make while working at Horne's.
Like all packages. Tie some bow around it first. I usually do mine like the gift above. You could do it in the middle or if it's a rectangle box, you can do it more towards the top like I did above. I usually just use enough ribbon to have very small tails like shown above that I can either keep or cut off completely. If you have tons of ribbon you can make those tails long so that they hang down the front of the package.
First create a loop with the ribbon. The diameter of this loop should be the width you want your bow to be when it's finished. I made a very big one because I wanted a very big bow. I used a very wide wire ribbon, but really almost any ribbon would work.
Tape the end of the ribbon in place. It won't stay very well, but it's ok. It'll work.
Loop the ribbon around at least 5 times. If you have tons of ribbon, do it 6 or 7 times. (I only did it 5 times to conserve ribbon.) Keep the loops tight together.
Close the loop flat.
Then fold it in half.
Then cut triangles out of the folded part of the loop on each side. Keep just a tiny bit of the loop left.
Use a small ribbon tie and cinch the middle of the large loop together.
Then separate the individual loops by pulling them apart and alternate twisting them down and then up.
Tie it to the ribbon on the package and snip the small ribbon.
Do some final arranging and you're done!
This idea can also, of course be down with ribbon that's a little thinner. You can play with the number of loops you use or the size of the loops. The more loops the fuller it will be. I usually increase the number of loops with the size of the bow I'm making. If I make a bow that will have a large diameter I will increase the number of times I loop it around.
This bow is so cute!! I just love working with tulle.
I found this great green tulle in the perfect width in the wedding section at Michael's. It was about the same price as or lower than some of there gift ribbons were ($2.99).
To make:
Create several loops of tulle on top of each other by wrapping it around your hands as shown above.
Grasp it in the middle like shown above and tie with small ribbon (or I just used a tiny piece of tulle).
Tie it onto the package. I think the bow looks super cute here, too. So you could leave it. Or...
Cut the loops apart on each side.
And cut the middle layers so that they are shorter than the ones on the outside edges.
And done. Precious.
I think this one might be my fave.
I did not even remember I had this fabulous gold glitter tulle. I bought it when I saw it in a sale bin at Jo Ann's and just knew I'd find the perfect use for it. I was right.
Create the pom the same way you did the fluffy tulle bow except cut the ends of the bow before tying it on and pull apart the layers and create a full circle pom.
Tie the pom onto the package.
And fluff! LOVE!
You could even play with mixing different color tulles.
I also made this one (not crazy about the color combo, but I wanted to show you the technique anyway) by rolling tulle along with the ribbon when making a Fancy Bow. It definitely created a very full bow.
I like this color combo and technique better, though. I created a Fluffy Tulle Bow and a Fancy bow and added them on together and fanned the tulle out nicely under the Fancy Bow. So fun.
I love simple bows. Why not add them to packages?!
The tulle for this bow needs to be very smooth. Instead of rolling to create the loop I folded it over itself several times as shown above.
Then fold a small piece of tulle over itself several times. This will be the middle of the bow.
Fold the bow like a fan and place the small piece of tulle around the middle and hot glue it to itself in the back.
And done! While I like this huge one, I think these would be precious if they were small.
Cuteness.
Fancy is always fun, but simple can be really great, too. I just love this fuzzy wired ribbon I found at Michael's. On the gift above I paired it with a glitter rick rack and tied a simple bow.
And on this one I thought that wired red fuzzy ribbon was enough!
I hope you enjoyed my Fancy Bow tutorials!! Have fun wrapping your own!!
Merry Christmas!
Linking to the great parties on my sidebar.
This marks the end to my Miss Lovie First Anniversary Event! Thank you so much for reading!
Today is the last day for the Shwin and Shwin Giveaway so be sure to go enter! The other giveaways are still going so go enter those as well!


loves these!
ReplyDeletethis is a great, great list of tutorials! Thanks so much for sharing! I'm having a link party on my blog and I'd be tickled pink if you'd link this up! http://caribbeanmissionarywife.blogspot.com/2011/12/t-time-48-and-link-party.html
ReplyDeleteI'm so glad I found this! I have a ton of ribbon I got at Joann's for 90% off that I want to use but I didn't know how to make bows. I will be saving this tutorial, thank you!!
ReplyDeleteohhhhh super fun!!! I love your ideas!! thanks. First time stopping by :)
ReplyDeleteAwesome tutorial! I'm pinning it!
ReplyDeleteFound you on Someday Crafts.
Thanks for the tutorial. They will look great on the gifts and so many gifts under your tree already!
ReplyDeleteyou make it look so simple. I must try all of them !!
ReplyDeleteThese are all so sweet Allie!! I love the tulle poofy one especially - that is really fun! Thanks for linking up to Think Pink Sundays - I featured you today! http://www.flamingotoes.com/2011/12/crush-of-the-week-think-pink-features-32/
ReplyDeleteHow fun! I've been making hair bows a lot lately :)
ReplyDeleteSo glad I found your site...just in time for wrapping! I'm a new follower. Stop by and visit and follow too if you like.
ReplyDeleteI love all your bows! Thanks so much for sharing your how to. My favorite is the glittery gold pouf. I'm your newest follower.
ReplyDeletehttp://chickenscratchny.blogspot.com
I love these. They are soooo cute. I can't wait to make my own. Thanks for sharing and showing the movements to make them.
ReplyDeleteThis is such a wonderful list of tutorials!!! I am hosting a 25 Days of Handmade Christmas event and I'm trying to wrap it up (no pun intended haha) with a few tutorials of things that will be more useful this close to Christmas, like wrapping and bow techniques! I was wondering if you'd be interested in sharing this as a guest post with my readers. My blog is embracingmessy.blogspot.com if you'd like to check it out. Feel free to email me at embracingmessy@gmail.com.
ReplyDeleteThanks!
Kelsey
embracingmessy.blogspot.com
I'm pinning this for sure! I think practice makes perfect, right? ;)
ReplyDeleteThank you!! I needed to make a big red bow to put on the collar of the doggie we are adopting tomorrow - my 6 year old daughter is in for the surprise of her LIFE!!
ReplyDeleteBy the way - I loved your use of children's scissors - I just happened to be using the exact pair of green handled kids scissors to make my bow tonight (naturally, the only ones I could find!) LOL.
Love this! I've used your tutorial link in a recent DIY post on my page, thank you!
ReplyDeletehttp://bishopandrook.blogspot.com/2012/12/diy-christmas-nip-tree.html
xo
Kristin
Ok. You're awesome! Love this!
ReplyDeleteso flippin' helpful! thank you very, very much!! :)
ReplyDeleteso flippin' helpful!! thank you very, very much for sharing! :)
ReplyDeleteUniqueness itself has its own charms and attractions. And when it comes to gifts, uniqueness is what makes it memorable and special. cheap Christmas gifts
ReplyDeleteGood chsristmas gift collection.
ReplyDeleteChristmas Gift Wrap and Packaging
Thanks for tutorial. With LabelsAndRibbon you can find perfect gift ribbons.....
ReplyDeleteHey Allie! I absolutely love this post and you're definitely one talented gift wrapper, that's for sure! I'd love to be able to use a couple of your pictures to illustrate how creative people can get with ribbons (and direct them to your site). I hope that's alright with you? You can always contact me on: joanna@imbull.com
ReplyDeleteHave a happy Christmas!
Hi I love your suggestions and the images you have put together and it is a real testament to your effort to have done this. Great to see Premium Christmas Gourmet Hampers Australia.
ReplyDeleteMorgan Spurlock's leverage with his documentaries is his emphasis on comedic components every step of the way. As opposed to dryly introducing realities, or notwithstanding skewing bits of data to help his inclination, his insights and figures are appeared with witty thoughts, clear joke and sharp mockery. http://www.mordocrosswords.com/2016/03/present-wrappers-aid.html
ReplyDeleteBeautiful collection......!!!
ReplyDeleteFancy Ribbons online | Online fancy Ribbons Laces
loves these!
ReplyDeleteburlap ring bearer pillow
waterproof outdoor pillow case
baby decorative pillow
Much appreciated although I've also got many ideas related to DIY and if you wanna know more about any ideas then contact me i love doing these things beside that i'm a writer also at Affordable assignment writing service in UK and help students who get stuck in their assignments.
ReplyDeleteThese Fancy Christmas Gift Wrap Bow Tutorials are incredibly creative—perfect for adding a personal touch to holiday presents! With the busy season ahead, it’s a relief to know you can hire someone to take your online class and free up time for festive fun. Love how these DIY bows elevate any wrapping style—definitely bookmarking this for December!
ReplyDelete