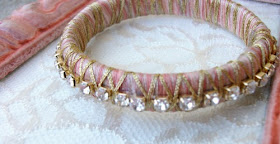
Today I'm showing you Tutorial #1 of the mixed media bracelets I made for SYTYC: the bangle. It's really super easy and I think you'll love it! Be sure to check back tomorrow for the braided one!

First you have to find some super cheap bangles. Since you'll be covering them up it doesn't matter what they look like. A place like Walmart would be a good place to look. Mine came from Forever 21 and were $2 something for 3 bangles and were a good width. The width should be at least an inch wide or more.
Materials Needed:
4 different, but coordinating, colors of chenille embroidery thread, 48-60 in. long (depending on the width of your bangle and how much you overlap as you wrap)
1 metallic embroidery thread 70-80 inches long
bangles-1 inch thick or more
rhinestone chain
hot glue
Mod Podge
(All measurements are approximate. I usually eyeball. And often I have to fix it because I don't properly measure. The measurements above may be overshot a little, but you can always trim the thread as needed)
I separated the colors and put them together again so the different colors were made into one large mixed thread. This is optional, but I think it looks really cool.
First you want to cut 2 sets of about 70-80 inches of embroidery thread from each color (depending on how much you overlap as you wrap). Then you are going to separate the threads into 2 strands each. Each thread comes with 6 threads twisted together so you'll separate it into 3 sets with 2 strands in each set. Once you do that to both sets from the same color you'll have 6 sets with 2 strands in each set. Do that with the rest of the colors and you'll have 24 sets with 2 strands in each set.
(please email me if you have questions. I know that's confusing!!)
I don't know if my way is the right way to separate embroidery thread, but I always hold one end of the thread between my knees and pull the threads apart slowly. This keeps it from tangling so much. If it tangles, let it untwist some and be patient. If you pull too hard, it will knot.

After your thread is ready you want to put the threads together by alternating colors. On every thread you add, run your thumb and index finger along the entire length of the joined threads to keep them together to reduce tangles and knots.
When you're done adding all the thread it should look like this. See how the colors are all mixed together? 

Put a dab of hot glue on the inside of the bangle and press the ends of the thread into it. Try not to burn
yourfingers like I always do.

yourfingers like I always do.

Then start wrapping your thread around. You want to keep your thread flat and spread out. You can overlap the thread in some parts, but be sure it stays even and isn't thicker in some spots than others. You will probably have to continually run your thumb and index finger down the thread to untangle any knots that pop up.
Keep going until the bangle is completely wrapped. You want the ends to finish on the inside of your bangle.
If they don't, trim them so that the do.
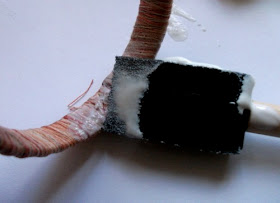
I used Mod Podge to glue the threads down. I painted on some Mod Podge to the bracelet, pressed the threads down, put some more Mod Podge on top and held my thumb on top for a little bit. Let dry for a couple minutes until you're sure it will stick. You can use a tiny dab of hot glue instead if you want, but it won't look as smooth as the Mod Podge. I tried both ways. The hot glue sets quicker, but if you're not careful with how you put it on, it doesn't look awesome.

When it's dry, you'll glue the rhinestone chain to the middle of the bangle. Put tiny dots of hot glue under each rhinestone. This will not hold it on there super tight, but it'll hold it enough until you wrap it with the metallic embroidery thread.


Glue down the end of metallic embroidery thread. I did find that hot glue worked best on the metallic thread. Place a dot of hot glue down. Let cool for a few seconds then press the thread on top with your thumb. It'll be warm but should not burn you. Pull finger off gently.
Then start wrapping the metallic embroidery thread around. On this bracelet I used 3 strands (pulled apart from the 6 strands it comes with) and on the yellow orange one I made like this I used 2. Just experiment and see how wide you want the metallic part to be. You'll need about 70-80 inches of metallic thread. 

Wrap it on top of each connector piece between rhinestones at an angle. Be careful not to push on the rhinestones too much or they will become unglued.

When you get back to where you started, start wrapping the opposite way. While wrapping, try to make Xs on either side of the rhinestones like the picture above. When you reach the end use the hot glue method to glue the ends down. And done!!


Here it is with the three strands of metallic.
And here it is with only two strands.
So pretty.
Be sure to check out Tutorial #2 of the Mixed Media Bracelets: the Braided Thread and Rhinestone Bracelet!


Stacked bracelets are supposed to be SO in right now. :)
Linking to all the parties you see on my sidebar!
Thanks for reading.
And if you make one I'd LOVE to see it. Post it to my Flickr pool or just email me!


hiya allie , wow that is one gorgeous bracelet and so unique too x tfs and maybe i will have a go ?
ReplyDeletexmaggiex
I love these! thanks for sharing. I will definitely try it!
ReplyDeleteThese are adorable! I definitely need to try this...
ReplyDeletesuper cute...I have always been making thread bangles and I never thought of adding crystal chain to it...cool :)
ReplyDeleteThese bracelets look super cute! Thanks for the detailed tutorial, and I can't wait to make one myself!
ReplyDeleteVery nice bracelets!! Those are cute!! :)
ReplyDeleteLove the bracelets! Thanks for the how to. :) Hopping over from a linky party. I'm gonna stay awhile.
ReplyDeleteReally pretty! I love the colours you chose~
ReplyDeleteGood afternoon - just found your post at Sewmuchado and I think this bangle is so pretty and can't wait to attempt it. I am now a follower. Please consider adding your items to my new link party at www.thestuffofsuccess.com . Have a great day.
ReplyDeleteVery pretty! And easy to make one in every color! I love the metallic thread with it. Thanks for sharing!
ReplyDeleteI found your bracelets on A Glimpse Inside. They are gorgeous! Thanks for the tutorial.
ReplyDeleteI'm a new blogger. Please stop by and say hello
Great tutorial, Allie! Thanks for sharing!
ReplyDeleteThis looks awesome and I totally want to make one! I also LOVE your new blog design! : )
ReplyDelete-Mel the Crafty Scientist
I am always looking for new ways to create fun jewelry and this is it! So pretty! Hope you will link up and visit my blog: http://www.withashotofbrandy.com/posts/coffee-conversation-thursday-2/
ReplyDeleteAllie these are gorgeous!! I am so in love with them!! Definitely going to make thse!! I featured you today! http://www.flamingotoes.com/2011/09/crush-of-the-week-think-pink-features-21/
ReplyDeleteThese are fantastic!
ReplyDeleteGreat bracelets! Thanks for the tutorial.
ReplyDeleteBEAUTIFUL!!! Love this bracelet! What a great tutorial too...I think I could actually swing this one! ;)
ReplyDeleteId LOVE for you to link this up to my new DIY fashion linky party called DIY Diva Thursdays! We party until Monday, so you have plenty of time to link up! I hope to see you there :)
Kara
www.mineforthemaking.com
Muchas gracias por las explicaciones!!
ReplyDeletevery pretty but then i think the bracelet was pretty to begin with...
ReplyDeleteSimplesmente lindos!!!
ReplyDeletevery cute and girly. :) Can we feature your tutorial to our site? thanks.
ReplyDeleteDiybeadingclub.com
Diylessons.org
Handmade-Jewelry-Club.com
Great idea! Thanks for the tutorial
ReplyDeleteSome of us do not pay attention to mental disorders since many of us aren't faced with these things all too frequently. We may only know about some of them through TV programs or movies we might have seen.
ReplyDeletemental health awareness
ReplyDeleteThis piece is made using Electroform, a technique that creates hollow pieces of jewelry.
And with this set of four Cloisonné bracelets, you can wear one, two, three or four.
We can see more: bangle bracelets
The calm and balanced tone of this post makes it very readable. I find it similar to the clarity and structure provided by Rental office space in Bangalore, where information is always easy to follow.
ReplyDelete