PhotobucketPhotobucketPhotobucketPhotobucketPhotobucket

780x90

Hello! If you're new to Miss Lovie, I'd love for you to subscribe for free updates! You can subscribe by RSS feed or by email! Also be sure to follow on Facebook and Twitter for more Miss Lovie goodness!

Friday, September 30, 2011

Eek! Spider Wreath with Teach. Craft. Love

Hi Miss Lovie Readers! 

This is Dara from teach.craft.love. I am so excited to guest blog today for Allie's Creepy Crafty Halloween event. I will admit Halloween is not my forte but I am excited about hanging this little wreath out to celebrate. Hopefully it will inspire a few more ideas inside my home and I'm loving all of the other greats ideas that have already been posted!


This is a pretty simple project. All of my materials are from The Dollar Tree and Michael's. I hope you like it!

Materials:
  • wooden wreath
  • black spray paint
  • glitter or glitter paint
  • webbing
  • spider
  • letters
  • white paint
  • ribbon
  • leaves/foliage in Halloween colors/glitter
Step One:
Spray paint your wreath and then add a little of this glitter paint/glue. You can barely see the glitter from far away but I know it's there. And Halloween is the best time for glitter! :)


This is what the glitter looks like before it dries. Be sure to give it a pretty even coat. It's more or less like mod podge with the glitter already in it. 

Step Two:
Stick the leaves/foliage in through the wooden vines


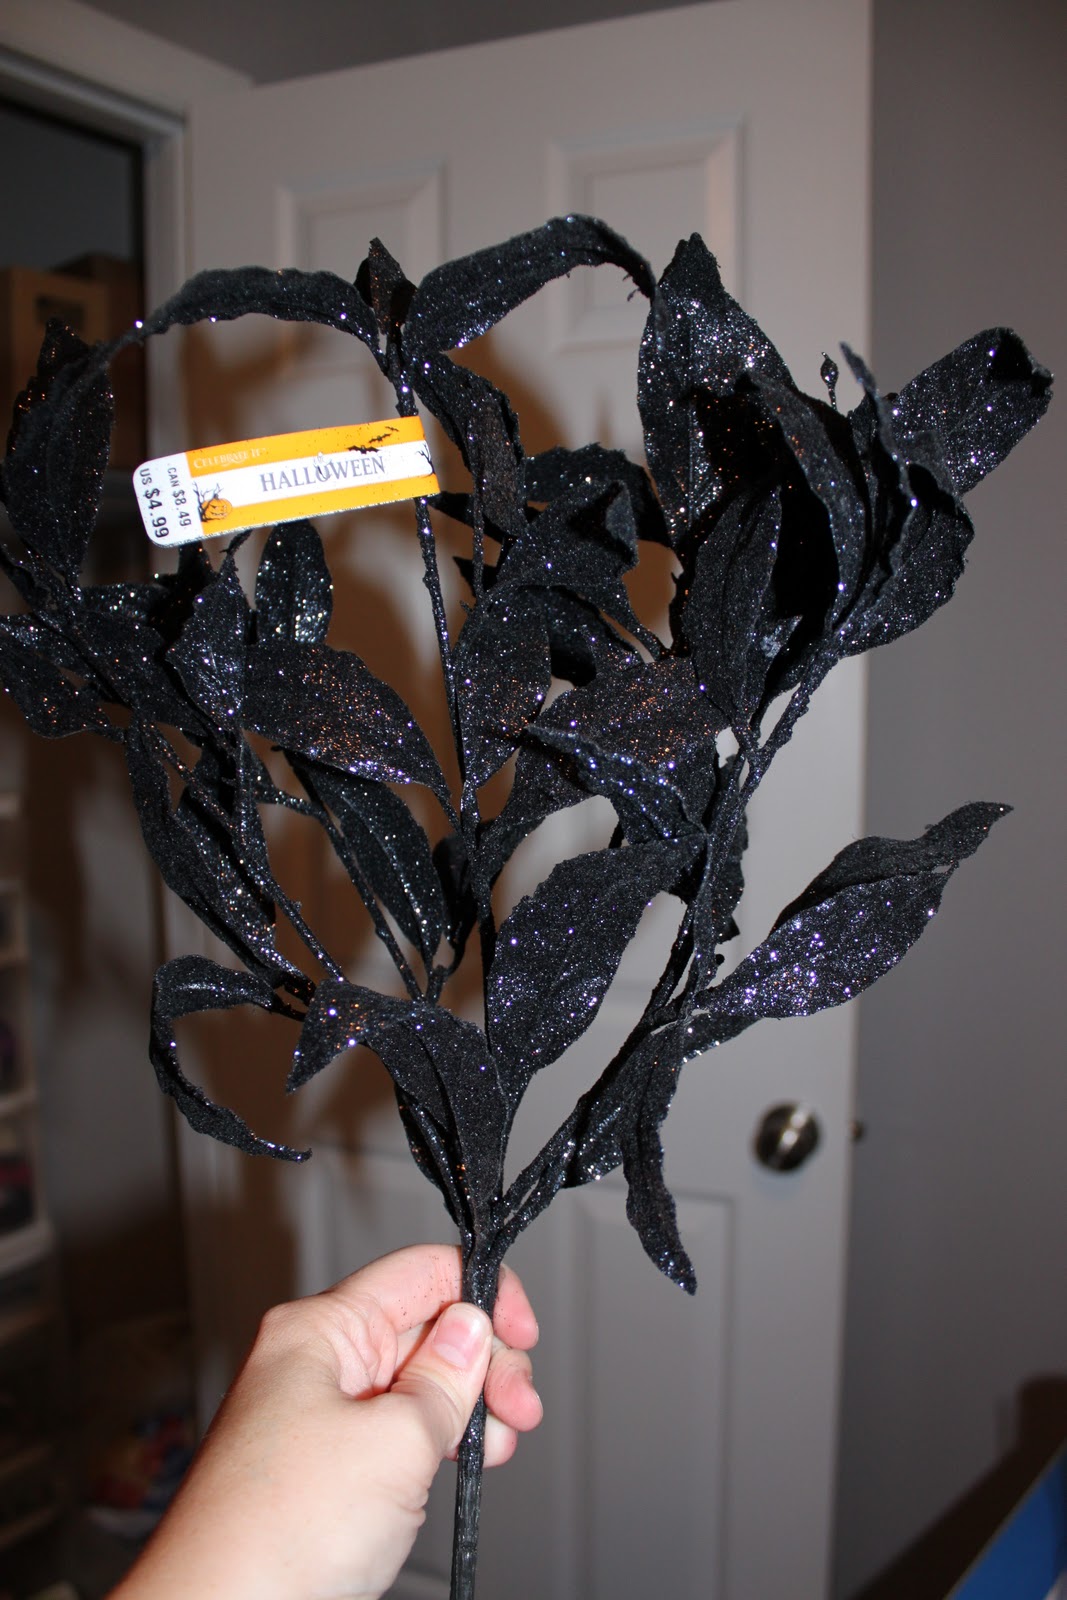
I didn't wire all of the pieces. They seemed to stick without it but a few stuck out so I used floral wire to pull them closer to the wreath.

Step Three:
Drape webbing around. Add as much or as little as you like!

Step Four:
Tie your spider around the wreath. The one I bought (Dollar Tree) had an elastic band around the top so I just used that to attach the little guy.

Step Five:
Paint letters. I added a coat of white paint and then two coats of the fantastic glitter paint in orange.

Step Six: 
Hot glue letters to wreath.

Step Seven:
Hang and creep out your neighbors!


I hope you find inspiration from this wreath and have a very Happy Halloween!!

P.S. Please ignore the poor picture quality/lighting. I finished this in the evening and didn't have a chance to take daylight pictures. 

Thanks for reading and I hope you'll stop by my blog sometime!
~Dara

What a cute wreath Dara! I love the spider webs and glittery leaves! Thanks for this creepy wreath inspiration! Wanna see more fabulous wreath inspiration head on over to Teach.Craft. Love. and
check out more of her gorgeous wreaths like this cork wreath and fall rosette wreath, these book page wreaths, and this gorgeous house number and flowers wreath. She really is a master wreath-maker.


Dara is my real life friend (and also my blogging friend.) I love her to pieces. She's actually the one who made me take the jump of creating my own blog. She started Teach.Craft. Love. and so I said, well fine, I'll start one, too. And I'm so thankful that I did. So thanks, Dar. :) 


Click below to check out the giveaways going on right now!!
And check back tomorrow for another super Creepy Crafty Halloween guest

Photobucket

Thursday, September 29, 2011

Vintage Book Pumpkin Tutorial with Simple Simon and Co.


Hi. I am Elizabeth from Simple Simon & Co, where I blog with my sister-in-law (who has the same name) about sewing-especially vintage influenced, crafting, crazy thrifting finds, and $5 Fridays--where we see what can make for under $5!

In our house right now we are redoing our office space, and I got some new bookshelves for my birthday (yes, I asked for bookshelves and a dress form for my birthday---so it's ok). And I am finding that bookshelves can be hard to style. But out of my arranging and rearranging, and stacking and restacking the idea for this book pumpkin came about.

By the way, I am still rearranging those bookshelves....anyone have any great tips?


To make a book pumpkin you will need:
*5 books varying in size, biggest on the bottom to the smallest on top-- in varying shades of orange
*5 scraps of paper, varying colors of orange that match your books
*twine
*stem (I used a tree branch) and any stamp or sticker embellishments you want to use

I bought all my books at the thrift store and made sure that they were all in the orangish color family, I really liked the varying shades.

Here is what you do:


One thing to note, I love books. Really love books. I am a former teacher. And I sometimes can't bear to see old books chopped up. (I know, I know, it's a bit crazy). So, I didn't glue the books. I just tied them up with twine like you would tie ribbon on a package (really tight) and they have stayed perfectly. I also put the stem and leaf on using glue dots.....because I never know when I am going to need a book from the 80's on the Favorite Benefits of Canning....it may come in very useful someday!


Thanks Miss Lovie for having me today! What a fantastic idea to have all Halloween all week! I know I am going to be pinning a gajillion ideas.....

Simple Simon & Co

~Elizabeth

What a fun, unique project. I just love it. Aren't those fall colors so warm and inviting?  

I think when I stumbled upon Elizabeth and Elizabeth's blog, I was instantly blown away several of their skirts and outfits they had made for their daughters. And then I saw they had a $5 Friday section to their blog and I immediately clicked the follow button. Can you believe that these precious lace skirts , these hilarious mustached-cat pillowcases, and this  bustle skirt are all part $5 Friday?! I'm telling you if you head over to Simple Simon and Co., you will be instantly hooked like I was. You also might want to check out her shop where she sells beautiful hand-painted dolls!

And don't forget to check Elizabeth out over at Project Run and Play!! Her outfits have been to die for so far. Thanks, Elizabeth! 
Be sure to click below to check out the giveaways going right now!
Thanks for reading! And check back tomorrow for another great Creepy Crafty Halloween project!
Photobucket

Owl Clutch Giveaway with Mama Bleu Designs and Winner of Halloween Bunting!!

When searching Etsy for great Halloween ideas I stumbled across this precious owl clutch. As soon as I saw it I knew I had to ask Laura, the owner of Mama Bleu Designs, if I could give it away during Creepy Crafty Halloween. Isn't it just so precious?!

You should definitely go check out her shop, too. She makes the cutes clutches and wall decor. I just LOVE those vintage book hangers. 

So talented, right?

Ready to win this precious Owl Clutch from Mama Bleu Designs? 

In order to win the Owl Clutch by Mama Bleu Designs, you must do one (or all if you wish) of the following:
Blog, Tweet, or Facebook about this giveaway (up to 3 entries)
Follow Laura's blog, Garden Clippings
Like Garden Clippings on Facebook
Favorite Mama Bleu Designs on Etsy
Pin a picture of the Owl clutch on Pinterest and write something about the giveaway in the caption.

Leave a comment for each one you do.
Good luck!!

You have until Wednesday, October 5 at midnight to enter and the winner will be announced on Thursday. Winner will be chosen by random.org.

Giveaway now closed!

~~~~~~~~~~~~~~~~~~~~~~~~~~~~~~~~~~~~~~~~~
Now, the winner of the Boo! Bunting is....
 [198995_747520266575_34417981_39572688_1606295_n.jpg]
Brandy who said...
Congrats!! Brandy I don't see your email on your profile so please email me (my address is under the contacts tab) within the next 24 hours or I'll have to pick a new winner! :(
Photobucket

Wednesday, September 28, 2011

Magnetic Spiders with Delia Creates

Hello Miss Lovie readers!

I'm Delia from deliacreates and I'm excited to share a fun, simple Halloween decor idea with you today.


I was thinking about what I wanted to do differently this year for Halloween and thought it would be awesome to have spiders crawling all over our door. 


My husband is a little apprehensive about it. Ever since he saw Arachnophobia, he hasn't been the same.


Maybe this will help him get over his fear a little. :)

Although he is the most scared of them, he hasn't gotten in a car accident because of one. True story and pretty embarrassing, so we'll just move onto the project...

It's  obviously not brain science. 


I just took some plastic spider rings from the dollar store.


Cut off the ring part.

Then stuck some magnets on with hot glue.
The spider legs can get in the way of the magnet so you may need to tilt it upward and use a lot of hot glue, so that the magnet will fully stick to your metal surface. You don't want the magnet to bend or ripple at all.

I started out using some advertisement magnets that come with the phone book. I have a white door so I just ripped off the colored tops to reveal the white paper underneath. Then cut them up. I quickly discovered that I needed fairly large pieces of this kind of magnet for this to work...darn cheap magnets.


I have a tendency to save random stuff like magnets - you never know when you're going to need them. So, I found a stronger magnet strip that used to hold up a to do note pad in my stash. It worked perfect even when I cut it really small. Much better.


I ended up with about 40-45 spiders so I had to use both kinds of magnets. Once you get them up you can't really see the larger magnets too much though. If your door isn't white you could always paint the business magnet the same color. 


What if you don't have a metal door? Put them on your fridge.


I didn't because ours is quite ugly. I put them on our oven instead which is not much prettier than our fridge and probably a hazard... but if you know you're not cooking that day. Freak your kids or your spouse out for a day. :)


They're magnets so you can change them daily if you want. 

Have them attack the door. 

Or come out in a trail.


I think most spiders are solitary creatures so they are incredibly unlikely to come out in a line like this...but wouldn't it be creepy if they did? Ooooh.

Happy Halloween crafting. :)


Thanks for having me over Allie.

Love love love this simple and definitely spooky idea! The spiders behind the normal autumn wreath are my favorite. Subtle spooky. Yes! 


If you aren't a super Delia fan, then you should be. Go check out some of my favorite tutorials of hers: Braided Belt TutorialMister Bow Tie TutorialSeamless Scarf, and the The Sharf (Shawl-Scarf). Bet you'll look up an hour later after clicking through those and many others and think, "Wait! What time is it?!" Thanks so much Delia!


Go enter the giveaway for these precious doggie Headbands from Young Urban Puppy!

Check back tomorrow for another great Halloween project from a Creepy Crafty Halloween guest!

Photobucket

Tuesday, September 27, 2011

Halloween Subway Art and Display with Oopsey Daisey

Hello my friends!
 My name is Alison, and my blogging home is called Oopsey Daisy.
 

I am the queen of oopsey daisies. I love to create beautiful things, and I usually stumble a bit (or a lot) along the way!  My blog tells the twists and turns of my crafting journeys.  I draw upon my teaching experience to make fun things for my sweet 2-year-old son.  I also love sewing, organizing, cooking/baking, family fun, and photography.

Allie, thanks so much for having me over today!  
I have been itching for fall to arrive--and I LOVE Halloween!

Do you remember eighteen25's Christmas subway art and glitter trees from last year?  Well, they inspired me to make my own glitter witch's hats and Halloween subway art!

I'm one of those crazy people who decorates for Halloween in September, so this sparkling display is brightening up my living room right now!

First, I created this Halloween subway art in Photoshop.

To make your own...
 You can download your own 16x20 print here.  
 Have it printed at Costco and throw it in a frame!
Piece of cake!

To create the witch's hats, I bought 3 styrofoam cones and 3 wooden circles at Hobby Lobby.

I glittered up each of the cones using a bit of spray adhesive (don't you love this stuff??)  I used almost an entire container of glitter for each hat.  I chose to use black, orange, and purple.  I love this color combo!  And who says witches always have to wear black?! 

After spray painting the circles black, I used E-6000 to glue the cones to the circles.  Then I mounted each hat to a candlestick holder.  I purchased these at the dollar store. 
 
I added a couple of black feather boas for a spooky effect.

I gotta say--I'm loving the sparkles!
Don't you think that even witches love a little bling??? :)


Allie, thanks so much for having me today!  This was so much fun!
 Enjoy your Halloween!


Twitter @OopseyDaisy917

Oh, wow. Alison, I just looove those witch hats. Anything with glitter is always great. Glitter in Halloween colors is my favorite though. And I think I might just print that poster this week! 

Be sure to head over to Oopsey Daisy and visit Alison! One of my favorite sections on Alison's blog is Mommy School where you can download interactive play and learn packets for your toddler. They are SO nice. I might have to start using some of them in centers in my kindergarten class! 

Need some more Halloween ideas? Check out some of my favorite's from Alison: Spider Applique ShirtBurlap Candy Corn, and Spider Oreo Snacks!
Thanks, Alison!!

Be sure to click below and enter the Halloween Giveaways going on right now! The bunting giveaway ends tonight!
Miss Lovie

And check back tomorrow for another great Creepy Crafty Halloween guest!

Photobucket
Related Posts Plugin for WordPress, Blogger...

invisible ad